在前端开发中目前webpack已经是最流行的项目构建和打包工具,其优秀的模块化支持,编译,热更新,代码分割,文件处理,打包等功能深受大家喜爱。使用webpack也有一段时间了,现在整理下自己对webpack的理解。
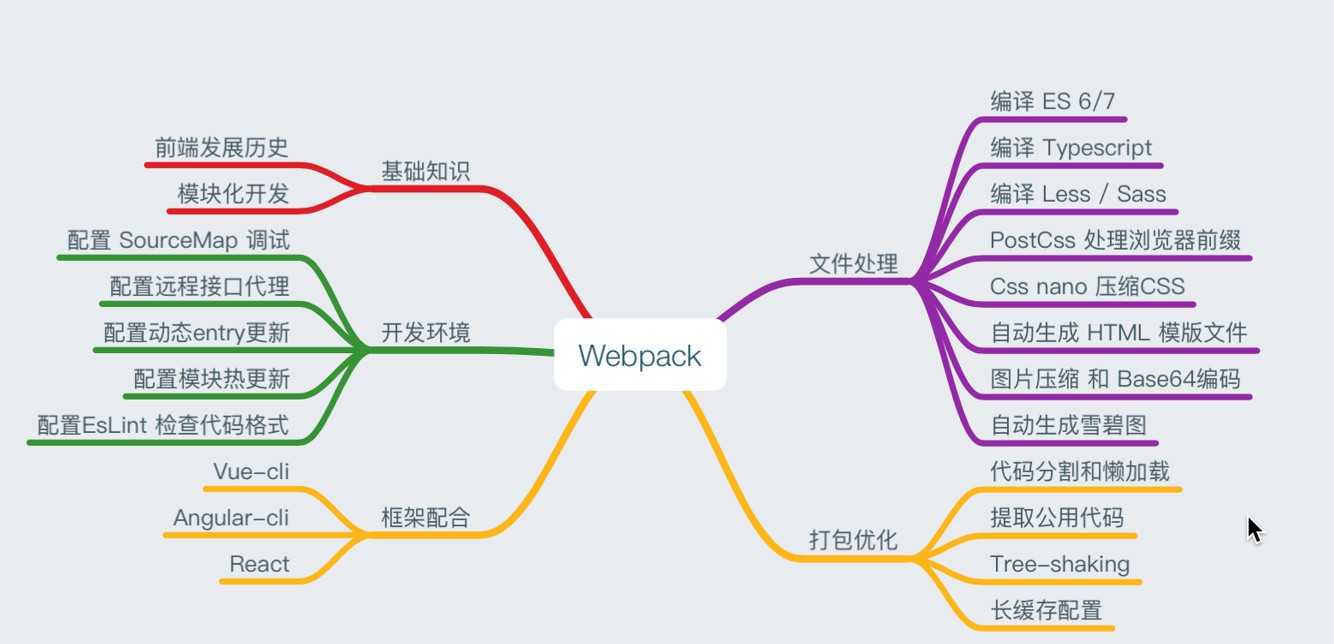
上图列举了webpack在前端领域中的应用场景,可以看出已经形成非常全面的工具了, 下面我们将通过示例的方式详解webpack的应用场景。
核心概念
- Enrty
- 打包的入口,代码的入口,多个或者单个
      module.exports = {
          entry: {
              index: ['index.js','app.js'],
              vendor: 'vendor.js'
          }
      }
- 打包的入口,代码的入口,多个或者单个
- Output
- 打包成的文件(bundle)/一个或者多个/自定义规则
      module.exports = {
          entry: {
              index: ['index.js','app.js'],
              vendor: 'vendor.js'
          },
          output: {
              path: `${__dirname}/build/static/`  // __dirname绝对路径
              filename: '[name].min.[hash:5].js'
          }
      }
- 打包成的文件(bundle)/一个或者多个/自定义规则
- Loaders
- 处理除js的其他文件,并将其转化成js模块
module.exports = { module: { rules: [ { test: /\.css$/, use: 'css-loader' } ] } } - loader的种类
- 编译相关:babel-loader、ts-loader
- 样式相关:style-loader、css-loader、less-loader、postcss-loader、stylus-loader
- 文件相关:file-loader、url-loader
- 处理除js的其他文件,并将其转化成js模块
- Plugins
- Plugins的作用
- 参与打包整个过程
- 打包优化和压缩
- 配置编译时的变量
  const webpack = require('webpack');
  module.exports = {
      plugins: [
          // 混淆和压缩代码
          new webpack.optimize.UglifyJsPlugin()
      ]
  }
- Plugins的种类
- 优化相关
- CommonsChunkPlugin:提取不同chunk之间的相同代码,提取出单独代码块
- UglifyJsWebpackPlugin:压缩和混淆代码
- 功能相关
- ExtractTextWebpackPlugin:提取css为单独的css文件
- HtmlWebapckPlugin:生成html
- HotModuleReplacementPlugin: 热更新
- CopyWebpackPlugin: 拷贝文件,如第三方已打包的文件
- 优化相关
- Plugins的作用
- webpack中的名词
- chunk:表示webpack中的代码块
- Bundle: 代表打包后的文件
- Module: 模块
使用webpack
-
webpack命令方式:打包js
Usage without config file: webpack <entry> [<entry>] <output> - webpack配置:
-
打包js
webpack --config webpack.config.js -
编译ES6、ES7、TS
npm install babel-loader babel-core babel-preset-env babel-plugin-transform-runtime ts-loader awesome-typescript-loader -Dnpm install babel-polyfill babel-runtime -S- Babel
- Babel-presets:设置编译的浏览器适应版本
- Babel-plugin
-
Babel Polyfill: 统一浏览器的全局垫片,会在全局引用和处理ES新语法,为引用做准备
import "babel-polyfill" - Babel Runtime Transform: 局部垫片,为框架做准备
在项目根目录下.babelrc配置babel相关的内容:如target、presets、plugin等
- typescript-loader
在根目录配置tsconfig.json
-
- 提取公共代码
module.exports = { plugins: [ new webpack.optimize.CommonsChunkPlugin({ name: 'common', minChunks:2 }) new webpack.optimize.CommonsChunkPlugin({ name: ['vendor','manifest'], minChunks:Infinity }) new webpack.optimize.CommonsChunkPlugin({ async: 'async-common', children: true, minChunks:Infinity }) ] } - 代码分割和懒加载
- webpack内置方法:require.ensure/require.include
- ES2015 Loader spec: System.import -> import() 返回的是Promise
// 动态加载模块 import( /*webpackChunkName: async-chunk-name*/ /*webpackMode: lazy*/ modulename )- 代码分割的场景
- 分离业务代码和第三方依赖
- 分离业务代码和业务公共代码和第三方依赖
- 分离首次加载和访问后加载的代码
  // pageA.js 异步加载lodash
  // 第一个lodash是引入但并不会执行,第二个lodash才是执行
  require.ensure(['./lodash'],function () {
      var _ = require('lodash')
      _.join([1,2,3])
  },vendor)
// 动态import加载 import(/* webpackChunkName: 'lodash' */'./lodash').then(function(){ console.log("test") })
- 处理css
// 配置css相关loader处理css文件 module.exports = { module: { rules: [ { test: /\.css$/, use: [ /*{ loader: 'style-loader', options: { insertInto: '#app', singleton: true, transform: './css.transform.js' } }, { loader: 'css-loader', options: { // minimize: true, modules: true, // 定义样式名称 localIdentName: '[path][name]_[local]_[hash:base64:5]' } }*/ /*通过css的link标签插入*/ /*{ loader: 'style-loader/url' }, { loader: 'file-loader' }*/ /*控制样式是否使用use()和unuse()方法*/ { loader: 'style-loader/useable' }, { loader: 'css-loader' } ] } ] } }module.exports = { rules:[ { test:/\.less$/, // use是从后往前就行处理 // extract-text-webpack-plugin用于提取css文件 use: ExtractTextWebpackPlugin.extract({ // 不提取css的处理方式 fallback: { loader: 'style-loader', options: { insertInto: '#app', singleton: true, transform: './css.transform.js' } }, // 处理css的loader use:[ { loader: 'css-loader', options: { minimize: true, modules: true, localIdentName: '[path][name]_[local]_[hash:base64:5]' } }, { loader:'less-loader' } ] }) }, { // 引入模块的loader test: path.resolve(_dirname,'src/app.js'), use: [ { loader: 'imports-loader', options: { $: 'jquery' } } ] } ] plugins: [ // extract-text-webpack-plugin用于提取css文件 new ExtractTextWebpackPlugin({ filename: '[name].mini.css', // 为true时会提取所有的css模块 allChunks: false }) ] } - PostCss in webpack
- PostCss
- 用js去转化css的工具,可以自定义处理css的规则
// 安装 npm install postcss postcss-loader autoprefixer css-nano css-nextmodule.exports = { module: { rules: [ { test: /\.less$/, use: [ { loader: 'style-loader', options: { insertInto: '#app', singleton: true, transform: './css.transform.js' } }, { loader: 'css-loader', options: { // minimize: true, modules: true, // 定义样式名称 localIdentName: '[path][name]_[local]_[hash:base64:5]' } }, // postcss用在less/sass和css loader之间 { loader: 'postcss-loader', options: { // 说明plugin时给postcss使用 ident: 'postcss', plugins: [ // 可以在顶部引入和调用 // require('autoprefixer')() require('postcss-cssnext')() // 合成雪碧图 require('postcss-sprites')({ // 生成的sprites spritePath: 'dist/assets/imgs/sprites', // 处理高清的图片 // 将图片命名为:1@2x.png/2@2x.png/2@2x.png retina: true }) ] } } { loader:'less-loader' } ] } ] } }
- 用js去转化css的工具,可以自定义处理css的规则
- Autoprefixer
- 给css加入浏览器兼容的前缀
- CSS-nano
- 优化和压缩css,同css-loader中minimix属性
- CSS-next
- 可以使用css的新语法会转化成浏览器可识别的语法
- browserslist
- 在package.json中配置公共的浏览器的版本要求,所有都公用一个配置
"browserslist": [ ">= 1%", "last 2 versions" ] - .browserslistrc 单独配置文件
- 在package.json中配置公共的浏览器的版本要求,所有都公用一个配置
- PostCss
- Tree Shaking(打包时去除未用到的js和css)
- 使用场景:引入第三方库或者常规优化时需要使用
- JS Tree Shaking和CSS Shaking
 module.exports = {
     plugins: [
         // 去除css
         new PurifyCSS({
             paths: glob.sync([
                 /*
                 path.resolve(_dirname,'./index.html')
                 */
                 // 在src下新建模板文件情况下
                 path.join(_dirname,'./*.html'),
                 path.join(_dirname,'./src/*.js')
             ])
         })
         // 去除未用到的js代码
         new webpack.optimize.UglifyJsPlugin()
     ]
 }
- 图片文件处理
- webpack对图片处理的使用场景及优化
- CSS引入图片background-image -> file-loader
- 自动合成雪碧图 -> postcss-sprites
- 压缩图片 -> img-loader
- 小图片转base64 编码 -> url-loader
  module.exports = {
      module: {
          rules: [
              {
                  test: /\.(png|jpg|jpeg|gif)$/,
                  use: [
                          /*{
                              // 处理和加载图片
                              loader:'file-loader',
                              options: {
                                  publicpath:'',
                                  outputPath: 'dist/',
                                  useRelativePath: true
                              }
                          },*/
                          {
                              // 将图片转化为base64 作为url载入url-loader可以替代file-loader
                              loader: 'url-loader',
                              options:{
                                  // 配置生成的文件名
                                  name:'[name].min.[ext]',
                                  // 图片大小限制
                                  limit:10000,
                                  publicpath:'',
                                  outputPath: 'dist/',
                                  useRelativePath: true
                              }
                          },
                          {
                              // 压缩图片
                              loader:'img-loader',
                              options: {
                                  // 压缩格式配置
                                  pngquant: {
                                      quality: 80
                                  }
                              }
                          }
                      ]
              }
          ]
      }
  }
- webpack对图片处理的使用场景及优化
- 字体文件处理(file-loader/url-loader)
module.exports = { module: { rules: [ { test: /\.(eot|woff2?|ttf|svg)$/, use: [ { // 会打包到css的base64 loader: 'url-loader', options: { name:'[name].min.[ext]', limit:5000, publicpath:'', outputPath: 'dist/', useRelativePath: true } } ] } ] } } - 第三方js库处理
- 场景:
- 第三方库在远程的CDN上:通过script标签将cdn地址迁到页面中,然后在源代码中使用即可
- 在本地源代码的第三方库或者通用库:使用webpack.providePlugin或者imports-loader注入
      module.exports = {
          resolve: {
              alias: {
                  // 加$代表解析jquery关键词解析到某个文件下,确切匹配
                  jquery$: path.resolve(_dirname,'src/libs/jquery.min.js')
              }
          },
          plugins: [
              // 在模块中注入第三方库,不用每次使用都import
              // 这是通过npm安装
              /*new webpack.ProvidePlugin({
                  $: 'jquery'
              })*/
              // 本地源代码依赖的库需要配置路径
              new webpack.ProvidePlugin({
                  $: 'jquery'
              })
          ]
      }
- 场景:
- HTML中引入图片进行压缩
module.exports = { module: { rules: [ { test: /\.html$/, use: [ { loader: 'html-loader', options: { // 对img进行处理 attrs: ['img:src','img:data-src'] } }, ] } ] } } - 配合优化
- 提前载入webpack加载代码,如用script标签将公共代码插入到html中,从而减少请求。
- inline-manifest-wepack-plugin
- html-webpack-inline-chunk-plugin(和html-loader配合)
      module.exports = {
          rules: [
              {
                  test: /\.js$/,
                  use: [
                      {
                          loader: 'babel-loader',
                          options: {
                              preset: ['env']
                          }
                      }
                  ]
              }
          ]
          plugins: [
              // 提取公共代码
              new webpack.optimize.CommonsChunkPlugin({
                  name: 'manifest',
              })
              // 将公共代码用script提前插入html
              new HtmlInlineChunkPlugin({
                  inlineChunks: ['manifest']
              })
              new HtmlWebpackPlugin({
                  filename: 'index.html',
                  template: './index.html',
                  minify: {
                      collapseWhitespace: true
                  }
              })
              // 每次打包清除dist的插件
              new CleanWebpackPlugin(['dist'])
          ]
      }
- 提前载入webpack加载代码,如用script标签将公共代码插入到html中,从而减少请求。
-
- webpack开发环境搭建
- 搭建本地服务器开发环境可以模拟真实的web服务器环境, 可以更好的调试代码。
- webpack watch mode:只能监听, 没有服务器
// 命令 webpack -w --progress --display-reasons --color - webpack-dev-server:官方提供的服务器
- live reloading:刷新浏览器
- 路径重定向
- 支持https
- 浏览器显示编译错误
- 接口代理
- 模块热更新(不刷新浏览器的情况下更新)
- devServer字段模式(inline/contentBase/port/historyApiFallback/https/proxy/hot/openpage/lazy/overlay)
  module.exports = {
      // 配置webpack-dev-server
      // 在 package.json配置:"serve": "webpack-dev-server --watch --inline --open“
      // 完整配置:"serve": "webpack-dev-server --watch --inline --open --config webpack--dev-server.js"
      devServer: {
          // 不刷新浏览器
          // inline:false,
          port: 9001,
          // 解决h5 history 导致的404
          // historyApiFallback: true // 所有的路径都被重置到了首页
          historyApiFallback: {
              // 跳转规则
              rewrites: [
                  {
                      // from: 'pages/a',
                      // to: 'pages/a.html'
                      // 配置rewrite规则
                      httpAcceptHeaders: ['text/html','application/xhtml+xml'],
                      // 正则匹配
                      from: /^\/([a-zA-Z0-9]+\/?)([a-zA-Z0-9])/,
                      to:function (context){
                          return '/' + context.match[1] + context.match[2] + '.html'
                      }
                  }
              ]
          },
          // 代理远程接口请求:http-proxy-middleware(options:target/changeOrigin/headers/logLevel/pathRewrite)
          proxy: {
              // 匹配路径
              '/api':{
                  // 实际请求的地址
                  target: 'https://m.weibo.cn',
                  // 改变源到url
                  changeOrigin: true,
                  // 请求携带header,增加header内容,请求需要身份验证的接口
                  headers: {
                      Cookie: 'xxxx'
                  },
                  // 重定向接口请求,方便书写
                  pathReWrite:{
                      '^/comments': '/api/comments'
                  },
                  // logLevel: 'debug',
                  // 热更新:webpack.HotModuleReplacementPlugin/webpack.NamedModulesPlugin
                  // 好处:保持应用的数据状态/节省调试时间/样式调试更快
                  hot: true
              }
          }
      }
  }
- express + webpack-dev-middleware:灵活配置
//安装依赖:express/koa opn webpack-middleware webpack-hot-middleware http-proxy-middleware connect-history-api-fallback // 配置server.js const express = require('express') const webpack = require('webpack') // 打开浏览器调试 const opn = require('opn') const app = express() const port = 3000 const webpackDevMiddleWare = require('webpack-dev-middleware') const webpackHotMiddleWare = require('webpack-hot-middleware') const proxyMiddleWare = require('http-proxy-middleware') const historyApiFallback = require('connect-history-api-fallback') // 将开发环境的配置载入 const config = require('./webpack.base.conf')('development') const compiler = webpack(config) // 载入proxy和historyApiFallback配置 const proxyTable = require('./proxy') for (let context in proxyTable) { app.use(proxyMiddleware(context, proxyTable[context])) } app.use(historyApiFallback(require('./historyApiFallback'))) // 使用中间件 app.use(webpackDevMiddleWare(compiler,{ publicPath: config.output.publicPath })) app.use(webpackHotMiddleWare(compiler)) app.listen( port, function() { console.log('listen to localhost:' + port) // 打开 opn('http://localhost:' + port) }) - Source Map 调试:会将生成的打包代码和原始的代码进行映射
- JS Source Map (Devtool/webpack.SourceMapDevToolPlugin/webpack.EvalSourceMapDevToolPlugin)
- CSS Source Map
- Eslint 检查代码格式(eslint/eslint-loader/eslint-plugin-html/eslint-friendly-formatter)
- 在webpack config新增eslint-loader
- 在根目录下建立 .eslintrc 文件配置书写规则
- 在package.json在eslintConfig中书写规则
- JS Standard Style https://standardjs.com/ (eslint-config-standard/eslint-plugin-promise/eslint-plugin-standard/eslint-plugin-import/eslint-plugin-node/eslint-config-xx)
  module.exports = {
      module: {
          rules: [
              test: /\.js$/,
              include: [path.resolve(_dirname,'src')],
              exclude: [path.resolve(_dirname,'src/libs')]
              use: [
                  {
                      loader: 'babel-loader',
                      options: {
                          presets: ['env']
                      }
                  },
                  {
                      loader: 'eslint-loader',
                      options: {
                          formatter: require('eslint-friendly-formatter')
                      }
                  }
              ]
          ]
      }
  }
// .eslintrc.js module.exports = { root: true, extends: 'standard', plugins:[ ], // 全局变量 globals: { $: true } rules: { // 缩进 indent: ['error',4], // 换行 'eol-last': ['error',never] }, env: { browsers: true } }
- 区分开发环境和生产环境(webpack-merge -> webpack.dev.conf.js/webpack.prod.conf.js/webpack.base.conf. js)
- 开发环境
- 模块热更新
- sourceMap
- 接口代理
- 代码规范检查
- 生产环境
- 提取公用代码
- 压缩混淆
- 文件压缩或者base 64编码
- 去除无用代码
- 共同点
// webpack.base.conf.js const productionConfig = require('./webpack.prod.conf') const developmentConfig = require('./webpack.dev.conf') const merge = require('webpack-merge') const generateConfig = env => { return { // 公共的配置部分 // 公共的部分如果需要环境判断则用env去判断,多个loader判断使用concat连接 } } module.exports = env => { let config = env === 'production' ? productionConfig : developmentConfig return merge(generateConfig(env), config) }- 同样的入口
- 同样的代码处理(loader处理)
- 同样的解析配置
- 开发环境
- webpack应用优化
- webpack打包结果分析
- Offical Analyse Tool
- mac
webpack --profile --json > stats.json - windows
webpack --profile --json | Out-file 'stats.json' - Encoding OEM上传stats.json到http://webpack.github.io/analyse/
- mac
- webpack-bundle-analyzer
- 插件方式(BundleAnalyzerPlugin)
var webpack = require('webpack') var path = require('path') var BundleAnalyzerPlugin = require('webpack-bundle-analyzer').BundleAnalyzerPlugin module.exports = { entry: { 'pageA': './src/pageA', 'pageB': './src/pageB', // 移除lodash测试 // 'vendor': ['lodash'] }, output: { path: path.resolve(__dirname, './dist'), publicPath: './dist/', filename: '[name].bundle.js', chunkFilename: '[name].chunk.js' }, plugins: [ new BundleAnalyzerPlugin(), new webpack.optimize.CommonsChunkPlugin({ names: ['vendor'], minChunks: 2 }) ] } - 命令行方式
webpack-bundle-analyzer stats.json
- 插件方式(BundleAnalyzerPlugin)
- Offical Analyse Tool
- 打包速度优化(文件多,页面多,依赖多)
- 分开vendor代码和app代码
- DllPlugin
// 专门打包第三方组件的webpack.dll.conf配置 const path = require('path') const webpack = require('webpack') module.exports = { entry: { vue: ['vue', 'vue-router'], ui: ['element-ui'] }, output: { path: path.join(__dirname, '../src/dll/'), filename: '[name].dll.js', library: '[name]' }, plugins: [ new webpack.DllPlugin({ path: path.join(__dirname, '../src/dll/', '[name]-manifest.json'), name: '[name]' }), new webpack.optimize.UglifyJsPlugin() ] } - DllReferencePlugin
      const HappyPack = require('happypack')
      module.exports = {
          plugins: [
              // 项目内容少的时候可能并不明显
              new HappyPack({
              id: 'vue',
              loaders: [{
                  loader: 'vue-loader',
                  option: require('./vue-loader.conf')
              }]
              }),

              // 引入打包的第三方组件
              new webpack.DllReferencePlugin({
              manifest: require('../src/dll/ui-manifest.json')
              }),

              new webpack.DllReferencePlugin({
              manifest: require('../src/dll/vue-manifest.json')
              }),
          }
      }
- DllPlugin
- UglifyJsPlugin(参数parallel:true 代表并行的进行压缩和混淆和cache)
- HappyPack(并行的处理loader, HappyPack.ThreadPool共享线程)
- babel-loader(开启缓存:options.cacheDirectory;规定打包范围:include/exclude)
- 其他(减少resolve/Devtool:去除sourcemap/cache-loader/升级node和webpack)
- 总结原则
- 并行处理多个任务UglifyJsPlugin/HappyPack
- 减少打包任务和限定范围(DllPlugin/DllReferencePlugin/include/exclude)
- 利用缓存
- 跟进新版本
- 分开vendor代码和app代码
- 长缓存优化
- 用户访问url下载请求,服务器通过header头cache设置缓存,以优化用户的访问速率
- 场景:改变app代码, vendor未变化(如何打包后hash不变化以达到缓存的目的)
- 提取vendor
- hash -> chunkhash
- 场景:引入新模块,模块顺序变化,vendor hash变化
const path = require('path') const webpack = require('webpack') module.exports = { entry: { main: './src/foo', // 分开业务代码和vendor代码 vendor: ['react'] }, output: { path: path.resolve(__dirname, 'dist'), // 分离vendor代码后, 使用chunkhash取代hash filename: '[name].[chunkhash].js' }, plugins: [ // 解决场景:引入新模块,模块顺序变化,vendor hash变化 // 原理: 给chunk设置name不因顺序而改变hash new webpack.NamedChunksPlugin(), new webpack.NamedModulesPlugin(), // 提取公共代码 new webpack.optimize.CommonsChunkPlugin({ name: 'vendor', minChunks: Infinity }), // 提取 runtime new webpack.optimize.CommonsChunkPlugin({ name: 'manifest' }) ] } - 总结
- 完全独立打包vendor
- 抽出manifest(webpack runtime)
- 分配确定的id,解决顺序变化导致的hash变化:webpack.NamedChunksPlugin(),webpack.NamedModulesPlugin()
- 动态模块给定模块名称
      // 模块动态加载
      import(/* webpackChunkName: 'async' */'./async').then(function (a) {
          console.log(a + '11')
      })
- webpack打包结果分析
- webpack多页面应用
- 特点
- 多入口entry
- 多页面html
- 每个页面不同的chunk
- 每个页面的参数
- 多配置和单配置
- 多配置优缺点
- 可以使用parallel-webpack来提高打包的速度
安装后在node_modules/webpack/parallel-webpack/bin/run.js执行` parallel-webpack –watch ` ` parallel-webpack –config` - 配置更加独立、灵活
- 不能多页面之间共享代码
      template
      <!DOCTYPE html>
      <html>
      <head>
          <meta charset="utf-8" />
          <meta http-equiv="X-UA-Compatible" content="IE=edge">
          <!-- 多页面模板 ejs语法-->
          <title><%= htmlWebpackPlugin.options.title %></title>
          <meta name="viewport" content="width=device-width, initial-scale=1">
      </head>
      <body>

      </body>
      </html>
// npm install webpack-merge(合成config) webpack(优化插件) html-webpack-plugin(生成html页面) clean-webpack-plugin(重新生成打包目录) extract-text-webpack-plugin(提取css) // 多配置 // 合并config const merge = require('webpack-merge') const webpack = require('webpack') // 生成html const HtmlWebpackPlugin = require('html-webpack-plugin') // 清除打包文件 const CleanWebpack = require('clean-webpack-plugin') // css提取 const ExtractTextWebpack = require('extract-text-webpack-plugin') const path = require('path') // 基本配置 const baseConfig = { entry: { // 单独对react打包,react全家桶也一样 react: ['react'] }, output: { // 绝对路径配置 path: path.resolve(__dirname, 'dist'), filename: 'js/[name].[chunkhash].js' }, module: { rules: [ // 处理css { test: /\.css$/, use: ExtractTextWebpack.extract({ fallback: 'style-loader', use: 'css-loader' }) } ] }, plugins: [ // 提取css new ExtractTextWebpack({ filename: 'css/[name].[hash].css' }), new CleanWebpack(path.resolve(__dirname, 'dist')), // 提取公共代码 new webpack.optimize.CommonsChunkPlugin({ name: 'react', // 只有react minChunks: Infinity }) ] } // 以下采用了ES6默认对象的写法 // 定义一个生成每个page config的函数 const generatePage = function ({ title = '', entry = '', template = './src/index.html', name = '', chunks = [] } = {}) { return { entry, plugins: [ new HtmlWebpackPlugin({ chunks, template, filename: name + '.html' }) ] } } // 生成pages的config数组 const pages = [ // 每个页面都需要加载react chunk generatePage({ title: 'page A', entry: { a: './src/pages/a' }, name: 'a', chunks: ['react', 'a'] }), generatePage({ title: 'page B', entry: { b: './src/pages/b' }, name: 'b', chunks: ['react', 'b'] }), generatePage({ title: 'page C', entry: { c: './src/pages/c' }, name: 'c', chunks: ['react', 'c'] }) ] // console.log(pages.map(page => merge(baseConfig, page))) // merge config并exports 一个数组 module.exports = pages.map(page => merge(baseConfig, page))
- 可以使用parallel-webpack来提高打包的速度
- 单配置优缺点
- 可以共享各个entry之间的公用代码
- 打包速度慢
- 输出的内容比较复杂
      // 同多配置只是最后处理方式不同
      // merge config并exports 一个数组
      console.log(merge([baseConfig].concat(pages)))
      // 通过concat合成一个config
      module.exports = merge([baseConfig].concat(pages))
webpack在框架中的应用
- 多配置优缺点
- 特点
- vue-cli:vue2.x + webpack
-
脚手架
npm install vue-cli -gvue list 查看相关命令vue init webpack my-vue-project - 项目结构(在代码中梳理)
- 配置文件(在代码中梳理)
-
- create-react-app: react + webpack
- 脚手架
- react-scripts
npm install create-react-app -gnpx create-react-app my-project(npm 5.2+)create-react-app my-project(npm 5.2-)npm startnpm testnpm run buildnpm install -g serveserve -s buildnpm run eject - 项目结构(在代码中梳理)
- 功能
- 支持ES6和JSX(内部配置了babel)
- 支持动态import
- 支持Fetch(通过polyfill垫片)
- 支持proxy
- 支持postcss
- 支持eslint
- 支持单元测试
- 不支持React Hot-reloading
- 弱支持CSS预处理器
- 自定义配置
- proxy配置
      // 在package.json增加配置
      "proxy": {
          "/api": {
              "target":"https://proxy.test.com",
              "changeOrigin": true
          }
      }
//单独配置setupProxy.js const proxy = require('http-proxy-middleware'); module.exports = function(app) { // ...You can now register proxies as you wish! app.use(proxy('/api', { target: 'http://172.19.5.35:9536', secure: false, changeOrigin: true, pathRewrite: { "^/api": "/" }, })); app.use(proxy('/apc', { target: 'http://172.19.5.34:9531', secure: false, changeOrigin: true, pathRewrite: { "^/apc": "/" }, })); //app.use(proxy('/apc', { target: 'http://172.19.5.34:9531' })); }; - Less配置
- 添加对应loader和配置即可,在postcss之前处理。
- React 热更新配置
- react-hot-loader(在webpack dev中配置和index.js根节点引用)
      // index.js
      import { AppContainer } from 'react-hot-loader'
      import React from 'react';
      import ReactDOM from 'react-dom';
      import './index.css';
      import './css/base.less';
      import * as serviceWorker from './serviceWorker';
      import App from './components/App';

      const render = Component => {
      ReactDOM.render(
          <AppContainer>
          <Component />
          </AppContainer>,
          document.getElementById('root')
      )
      }

      // ReactDOM.render(<Index />, document.getElementById('root'));
      render(App)

      // If you want your app to work offline and load faster, you can change
      // unregister() to register() below. Note this comes with some pitfalls.
      // Learn more about service workers: https://bit.ly/CRA-PWA
      serviceWorker.unregister();

      if (module.hot) {
          module.hot.accept('./components/App', () => {
              render(App)
          })
      }
// webpack.config.js entry: [ // 其他配置 'react-hot-loader/patch', //设置模块热更新 ], module: { rules: [ { oneof: [ // "url" loader works like "file" loader except that it embeds assets // smaller than specified limit in bytes as data URLs to avoid requests. // A missing `test` is equivalent to a match. { test: [/\.bmp$/, /\.gif$/, /\.jpe?g$/, /\.png$/], loader: require.resolve('url-loader'), options: { limit: 10000, name: 'static/media/[name].[hash:8].[ext]', }, }, // Process application JS with Babel. // The preset includes JSX, Flow, TypeScript, and some ESnext features. { test: /\.(js|mjs|jsx|ts|tsx)$/, include: paths.appSrc, loader: require.resolve('babel-loader'), options: { customize: require.resolve( 'babel-preset-react-app/webpack-overrides' ), plugins: [ [ require.resolve('babel-plugin-named-asset-import'), { loaderMap: { svg: { ReactComponent: '@svgr/webpack?-svgo,+ref![path]', }, }, }, ], // 模块热更新 'react-hot-loader/babel' ], // This is a feature of `babel-loader` for webpack (not Babel itself). // It enables caching results in ./node_modules/.cache/babel-loader/ // directory for faster rebuilds. cacheDirectory: true, cacheCompression: isEnvProduction, compact: isEnvProduction, }, ] } ] }
- react-hot-loader(在webpack dev中配置和index.js根节点引用)
- proxy配置
- 脚手架
- angular-cli
- 脚手架
npm install -g @angular/cling new ng-project --style=less --directory =srcng g/generateng serveng buildng testng e2eng lint - ng serve(启动Webpack Dev Server)
- 编译Less/Sass
- 编译Typescript
- 打包JS/CSS
- 热更新
- 代码分割
- 接口代理
-
接口代理
ng serve --proxy-config proxy.conf.json
-
第三方依赖安装
npm install lodash --savenpm install @type/lodash --save-dev
- 脚手架
webpack总结
- 什么是webpack?它和grunt,gulp有什么不同?
在webpack里一切文件皆模块,通过loader转换文件,通过plugin注入钩子,最后输出由多个模块组合成的文件,webpack专注构建模块化项目。webpack可以堪称是一个模块打包器,它可以递归的打包项目中的所有的模块,最终生成几个打包后的文件。它和其他工具最大的不同是它支持(code-splitting )代码分割、模块化(AMD、ESM、CommonJs),全局分析。 与grunt、gulp的不同
-
Webpack通过分析你的项目结构,找到JavaScript模块以及其它的一些浏览器不能直接运行的拓展语言(Scss,TypeScript等),并将其转换和打包为合适的格式供浏览器使用。Gulp/Grunt是一种能够优化前端的开发流程的工具,而WebPack是一种模块化的解决方案.
-
他们的工作方式也有较大区别:
-
Grunt和Gulp的工作方式是:在一个配置文件中,指明对某些文件进行类似编译,组合,压缩等任务的具体步骤,工具之后可以自动替你完成这些任务。
-
Webpack的工作方式是:把你的项目当做一个整体,通过一个给定的主文件(如:index.js),Webpack将从这个文件开始找到你的项目的所有依赖文件,使用loaders处理它们,最后打包为一个(或多个)浏览器可识别的JavaScript文件。
-
-
- 什么是bundle、chunk、module?
bundle是webpack打包出来的文件,chunk是webpack在进行模块的依赖分析的时候,代码分割出来的代码块。module是开发中的单个模块。
- 什么是loader?什么是Plugin?
loader是用来告诉webpack如何转化处理某一种类型的文件,并且引入到打包出的文件中。 Plugin是用来自定义webpack打包过程的方式,一个插件是含有apply方法的一个对象,通过这个方法可以参与到整个webpack打包的各个流程(生命周期),相当于钩子函数。
- webpack-dev-server和http服务器如nginx有什么不同?
webpack-dev-server使用内存来储存webpack开发环境下的打包文件,并且可以使用模块进行热更新。它比传统的http服务开发更加简单高效。
- 什么是模块热更新?
模块热更新是webpack的一个功能,它可以使代码修改后不用刷新浏览器就可以更新。它的实现原理是websocket推送变更消息,监听到变化,代码重新执行一遍,修改数据。
- webpack的工作原理?
webpack 的工作原理,如果不涉及到其他的插件其实从webpack 打包出来的源码中就能看出,或者是他产出的profile,webpack 会把打包后的文件都编号,然后再通过内置的方法require,表面上是这样,其实其内部还涉及到了一系列的依赖分析,其中涉及到抽象语法树(Abstract Syntax Tree) 等等一系列的行为。
- 什么是长缓存?在webpack中如何做到长缓存?
浏览器在用户访问页面的时候,为了加快加载速度,会对用户访问的静态资源进行储存,但是每一次代码升级或更新都需要浏览器去下载新代码。最方便和简单的方式就是引入新的文件名称。在webpack中可以在output给输出的文件chunkhash,并且分离经常更新的代码和框架的代码。通过NamedModulesPlugin或HashedModuleIdsPlugin使再次打包的文件名不变。
- 什么是Tree-shaking? CSS可以Tree-shaking?
Tree-shaking是指在打包中去除那些引入了,但是在代码中没有被用到的那些死代码。在webpack中Tree-shaking是通过uglifgJSPlugin来Tree-shaking。JS. CSS需要使用Plfify-CSS.
- Webpack工程化思想
一切皆模块、急速的调试响应速度、优化应该自动完成。零配置、更快、更小、优化应该自动完成。
-
webpack动态import原理
import()把模块的名字作为一个参数,并且返回一个Promise: import(name)->Promise.通过函数式的引入模块,import()函数会返回一个promise,做到动态/异步的去加载模块。
```js function determineDate() { import('moment').then(function(moment) { console.log(moment().format()); }).catch(function(err) { console.log('Failed to load moment', err); }); } determineDate(); ``` ```js // 下面2行代码,没有指定webpackChunkName,每个组件打包成一个js文件。 const ImportFuncDemo1 = () => import('../components/ImportFuncDemo1') const ImportFuncDemo2 = () => import('../components/ImportFuncDemo2') // 下面2行代码,指定了相同的webpackChunkName,会合并打包成一个js文件。 // const ImportFuncDemo = () => import(/* webpackChunkName: 'ImportFuncDemo' */ '../components/ImportFuncDemo') // const ImportFuncDemo2 = () => import(/* webpackChunkName: 'ImportFuncDemo' */ '../components/ImportFuncDemo2') export default new Router({ routes: [ { path: '/importfuncdemo1', name: 'ImportFuncDemo1', component: ImportFuncDemo1 }, { path: '/importfuncdemo2', name: 'ImportFuncDemo2', component: ImportFuncDemo2 } ] }) ``` - webpack代码分割和按需加载
- CommonsChunkPlugin插件
- entry和output配置提取库代码和公共代码
- 提取Runtime(运行时)代码(manifest,以保证chunkhash不变)
- 使用DllPlugin和DllReferencePlugin分割代码(dll包的代码是不会执行的,需要在业务代码中通过require显示引入。)
- import()和require.ensure() -> 动态加载代码
- webpack和gulp区别(模块化与流的区别)
gulp强调的是前端开发的工作流程,我们可以通过配置一系列的task,定义task处理的事务(例如文件压缩合并、雪碧图、启动server、版本控制等),然后定义执行顺序,来让gulp执行这些task,从而构建项目的整个前端开发流程。
    // gulp的使用

    npm install gulp-cli -g
    npm install gulp -D
    npx -p touch nodetouch gulpfile.js
    gulp --help
gulpfile.js是gulp项目的配置文件,是位于项目根目录的普通js文件(其实将gulpfile.js放入其他文件夹下亦可)。
    //导入工具包 require('node_modules里对应模块')
    var gulp = require('gulp'), //本地安装gulp所用到的地方
        less = require('gulp-less');
    //定义一个testLess任务(自定义任务名称)
    gulp.task('testLess', function () {
        gulp.src('src/less/index.less') //该任务针对的文件
            .pipe(less()) //该任务调用的模块
            .pipe(gulp.dest('src/css')); //将会在src/css下生成index.css
    });

    gulp.task('default',['testLess', 'elseTask']); //定义默认任务

    //gulp.task(name[, deps], fn) 定义任务  name:任务名称 deps:依赖任务名称 fn:回调函数
    //gulp.src(globs[, options]) 执行任务处理的文件  globs:处理的文件路径(字符串或者字符串数组)
    //gulp.dest(path[, options]) 处理完后文件生成路径
上述例子运行gulp testLess即可执行gulp流任务进行css处理。官方网站
webpack是一个前端模块化方案,更侧重模块打包,我们可以把开发中的所有资源(图片、js文件、css文件等)都看成模块,通过loader(加载器)和plugins(插件)对资源进行处理,打包成符合生产环境部署的前端资源。