React组件化
容器组件和展示组件
基本原则:容器组件负责数据获取,展示组件负责根据props显示信息 优点
- 数据和视图分离,分工明确
- 重用性高
- 更高的可用性
- 易于测试
// React.demo PureComponent

import React, { Component, PureComponent } from "react";
// 展示组件
// shouldComponentUpdate

// class Comment extends PureComponent {
// //   shouldComponentUpdate(nextProps) {
// //     if (
// //       nextProps.data.body === this.props.data.body &&
// //       nextProps.data.author === this.props.data.author
// //     ) {
// //       return false;
// //     }
// //     return true;
// //   }
// // PureComponent可以取代上述判断: PureComponent会去比较数据是否发生变化,从而是否触发houldComponentUpdate(
//   render() {
//     // console.log("render");
//     return (
//       <div>
//         <p>{this.props.body}</p>
//         <p>------{this.props.author}</p>
//       </div>
//     );
//   }
// }
// 展示组件  React.memo实现函数式组件也有PureComponent的功能:内部就是高阶组件
const Comment = React.memo(({ body, author }) => {
//   console.log("render");
  return (
    <div>
      <p>{body}</p>
      <p>------{author}</p>
    </div>
  );
});
// 容器组件
export default class CommentList extends Component {
  constructor(props) {
    super(props);

    this.state = {
      comments: []
    };
  }

  componentDidMount() {
      // 模拟数据接口
    setInterval(() => {
      this.setState({
        comments: [
          { body: "react is very good", author: "facebook" },
          { body: "vue is very good", author: "youyuxi" }
        ]
      });
    }, 1000);
  }

  render() {
    return (
      <div>
        {this.state.comments.map((c, i) => (
          <Comment key={i} {...c} />
        ))}
      </div>
    );
  }
}
React组件扩展=>组合而非继承
import React, { Component } from "react";
// 组合而非继承
//Dialog
function Dialog(props) {
  return (
    // github page build failed "}}"
    <div style={
      { border: 4px solid `${props.color||"blue"}`}
    }>
      {/* 等效vue中匿名插槽 */}
      {props.children}
      {/* 等效vue中具名插槽 */}
      <div className="abc">{props.footer}</div>
    </div>
  );
}

function WelcomeDialog() {
  const confirmBtn = (
    <button onClick={() => alert("react确实好!")}>确定</button>
  );
  return (
    <Dialog color="green" footer={confirmBtn}>
      <h1>欢迎光临</h1>
      <p>感谢使用react!!!</p>
    </Dialog>
  );
}

// 模拟接口
const api = {
  getUser: ()=>({name: 'jerry', age: 20})
}


function Fetcher(props) {
  let user = api[props.name]();
  return props.children(user);
}
// 过滤Children
function FilterP(props) {
  return (
    <div>
      {/* React.Children提供若干操作嵌套内容的帮助方法 */}
      {React.Children.map(props.children, child => {
        console.log(child); // vdom
        if (child.type != 'p') { // 过滤掉非p标签
          return;
        }
        return child;
      })}
    </div>
  )
}
// RadioGroup组件
function RadioGroup(props){
  return (
    <div>
      {React.Children.map(props.children, child => {
        return React.cloneElement(child, {name: props.name})
      })}
    </div>
  )
}
//Radio组件
function Radio({children, ...rest}){
  return (
    <label>
      <input type="radio" {...rest}/> {children}
    </label>
  )
}

export default class Composition extends Component {
  render() {
    return (
      <div>
        <WelcomeDialog />
        {/* children内容可以是任意表达式 */}
        <Fetcher name="getUser">
          {({name, age}) => (<p>{name}-{age}</p>)}
        </Fetcher>
        {/* 操作children */}
        <FilterP>
          <h3>React</h3>
          <p>react很不错</p>
          <h3>Vue</h3>
          <p>vue也不错</p>
        </FilterP>
        {/* 编辑children 将name传递到子组件 */}
        <RadioGroup name="mvvm">
          <Radio value="vue">vue</Radio>
          <Radio value="react">react</Radio>
          <Radio value="angular">angular</Radio>
        </RadioGroup>
      </div>
    );
  }
}
高阶组件
为了提高组件复用率,首先想到的是抽离相同逻辑,再react中利用HOC(Higher-Order Components)的概念 高阶组件是一个组件,但是其返回另外一个组件,产生的新的组件对属性进行包装,也可以重写生命周期 高阶组件实际上是一个函数,接收一个组件进行功能扩展返回另外一个组件。是扩展组件逻辑做好用的方式
import React, { Component } from "react";
const withHocComponent = ((Component)=>{
  const newComponent = (props)=>{
    return <Component {...props} name="测试高阶组件" />
  }
  return newComponent;
})
// withHocComponent代理了Component组件, 只是多传递了name参数
支持链式调用 ES7 的装饰器语法可以处理链式不断调用的问题 需要装一个插件 npm install –save-dev babel-plugin-transform-decorations-legacy
// config-overrides.js配置antd按需加载和装饰器
const { injectBabelPlugin } = require("react-app-rewired");

module.exports = function override(config, env) {
  // antd按需加载
  config = injectBabelPlugin(
    ["import", { libraryName: "antd", libraryDirectory: "es", style: "css" }],
    config
  );

  // 添加装饰器能力
  config = injectBabelPlugin(
    ["@babel/plugin-proposal-decorators", { legacy: true }],
    config
  );

  return config;
};
import React, { Component } from "react";

// 基本组件
// function test(props){
//   rerurn (
//     <div>{props.stage}-{props.name}</div>
//   )
// }
// 高阶组件1
const withName = Comp => {
  // 甚至可以重写组件声明周期
  class NewComponent extends Component {
    componentDidMount() {
      console.log("do something");
    }
    render() {
      return <Comp {...this.props} name="高阶组件试用介绍" />;
    }
  }
  return NewComponent;
};
// 高阶组件2
const withLog = Comp => {
  console.log(Comp.name + "渲染了");
  return props => <Comp {...props} />;
};
// 装饰器的调用方法=>只支持class类的组件,不支持函数式组件
// 其实就是java/python中的注解,其实就是工厂函数=>对组件进行加工并返回一个全新的组件
@withName
@withLog
class test extends Component {
  render() {
    return (
      <div>
        {this.props.stage} - {this.props.name}
      </div>
    );
  }
}
// 链式操作=>先增加名字属性,再增加log功能
// export default withLog(withName(test));
export default test;
组件通信—上下文(context)
可以进行跨层级进行通信(传值),一个是Provider一个是Consumer,Provider在外域的组件,内部需要数据的,就用Consumer来读取 Context 主要应用场景在于很多不同层级的组件需要访问同样一些的数据。请谨慎使用,因为这会使得组件的复用性变差 Context 能让你将这些数据向组件树下所有的组件进行“广播”,所有的组件都能访问到这些数据,也能访问到后续的数据更新。使用 context 的通用的场景包括管理当前的 locale,theme,或者一些缓存数据
  // Context 可以让我们无须明确地传遍每一个组件,就能将值深入传递进组件树。
// 为当前的 theme 创建一个 context(“light”为默认值)。
const ThemeContext = React.createContext('light');

class App extends React.Component {
  render() {
    // 使用一个 Provider 来将当前的 theme 传递给以下的组件树。
    // 无论多深,任何组件都能读取这个值。
    // 在这个例子中,我们将 “dark” 作为当前的值传递下去。
    return (
      <ThemeContext.Provider value="dark">
        <Toolbar />
      </ThemeContext.Provider>
    );
  }
}

// 中间的组件再也不必指明往下传递 theme 了。
function Toolbar(props) {
  return (
    <div>
      <ThemedButton />
    </div>
  );
}

class ThemedButton extends React.Component {
  // 指定 contextType 读取当前的 theme context。
  // React 会往上找到最近的 theme Provider,然后使用它的值。
  // 在这个例子中,当前的 theme 值为 “dark”。
  static contextType = ThemeContext;
  render() {
    return <Button theme={this.context} />;
  }
}
Provider和Consumer的封装
import React, { Component } from "react";

// 1. 创建上下文
const Context = React.createContext();

const store = {
  name: "test",
  sayHi() {
    console.log(this.name);
  }
};
// // 使用
// export default class ContextSample extends Component {
//   render() {
//     return <Context.Provider value={store}>
//       <div>
//         {/* {获取数据} */}
//         <Context.Consumer>
//           {/* {内嵌一个函数} */}
//           {value=><div onClick={()=>value.sayHi()}>{value.name}</div>}
//         </Context.Consumer>
//       </div>
//     </Context.Provider>

//   }
// }
// 使用高阶组件封装Provider和Consumer
// 传入一个组件并返回一个新组件
const withProvider = Comp => props => (
  <Context.Provider value={store}>
    <Comp {...props} />
  </Context.Provider>
);
const withConsumer = Comp => props => (
  <Context.Consumer>
    {/* 必须内嵌一个函数 */}
    {value => <Comp {...props} value={value} />}
  </Context.Consumer>
);
// 内部组件Inner需要获取数据,相当于将Inner组件传递进入withConsumer,得到扩展value属性的新组件
@withConsumer
class Inner extends Component {
  render() {
    return <div>{this.props.value.name}</div>;
  }
}

@withProvider
// 注入数据,将ContextSample使用Provider封装
class ContextSample extends Component {
  render() {
    return <div><Inner></Inner></div>;
  }
}

export default ContextSample
如果你只是想避免层层传递一些属性,组件组合(component composition)有时候是一个比 context 更好的解决方案。
// 一种无需 context 的解决方案是将 Avatar 组件自身传递下去,因而中间组件无需知道 user 或者 avatarSize 等 props:
function Page(props) {
  const user = props.user;
  const userLink = (
    <Link href={user.permalink}>
      <Avatar user={user} size={props.avatarSize} />
    </Link>
  );
  return <PageLayout userLink={userLink} />;
}

// 现在,我们有这样的组件:
<Page user={user} avatarSize={avatarSize} />
// ... 渲染出 ...
<PageLayout userLink={...} />
// ... 渲染出 ...
<NavigationBar userLink={...} />
// ... 渲染出 ...
{props.userLink}

// 这种将逻辑提升到组件树的更高层次来处理,会使得这些高层组件变得更复杂,并且会强行将低层组件适应这样的形式

//你的组件并不限制于接收单个子组件。你可能会传递多个子组件,甚至会为这些子组件(children)封装多个单独的“接口(slots)”
function Page(props) {
  const user = props.user;
  const content = <Feed user={user} />;
  const topBar = (
    <NavigationBar>
      <Link href={user.permalink}>
        <Avatar user={user} size={props.avatarSize} />
      </Link>
    </NavigationBar>
  );
  return (
    <PageLayout
      topBar={topBar}
      content={content}
    />
  );
}
// 这种模式足够覆盖很多场景了,在这些场景下你需要将子组件和直接关联的父组件解耦。如果子组件需要在渲染前和父组件进行一些交流,你可以进一步使用 render props。
React的Fiber架构
- 改变了之前react的组件渲染机制,新的架构使原来同步渲染的组件现在可以异步化,可中途中断渲染,执行更高优先级的任务。释放浏览器主线程,
- Fiber引擎的关键特性
- 增量渲染(将渲染任务差分成块,分开渲染)
- 更新时能够暂停,终止和复用渲染任务
- 给不同类型的更新赋予优先级
- 并发方面新的基础能力
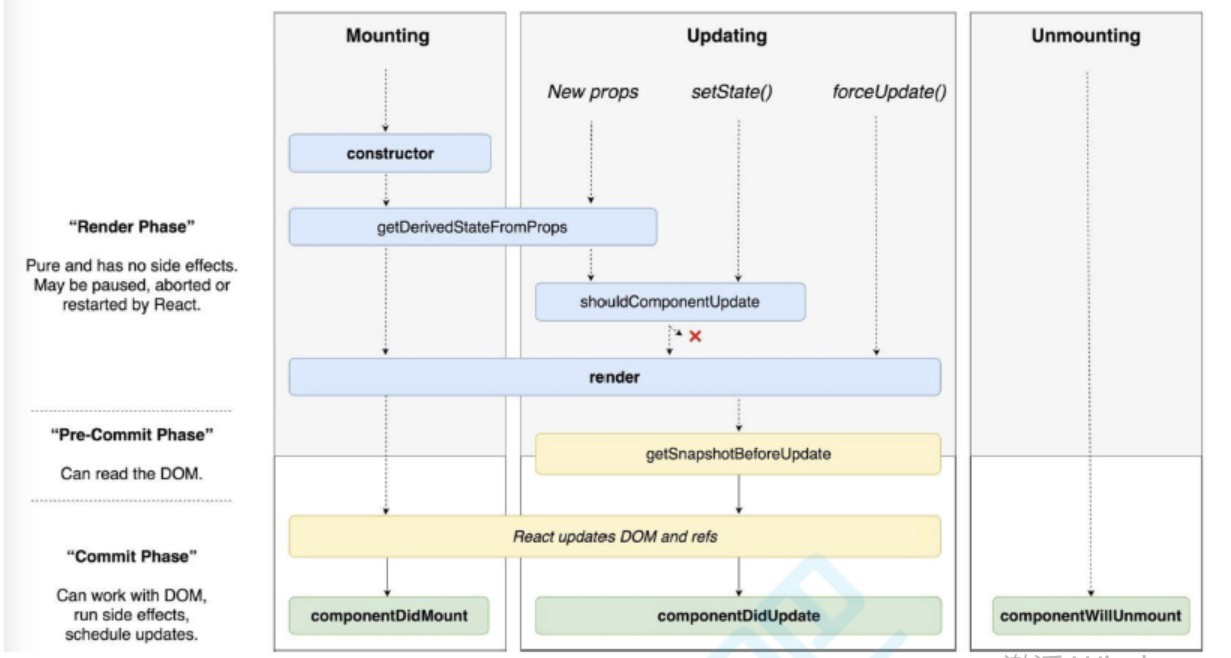
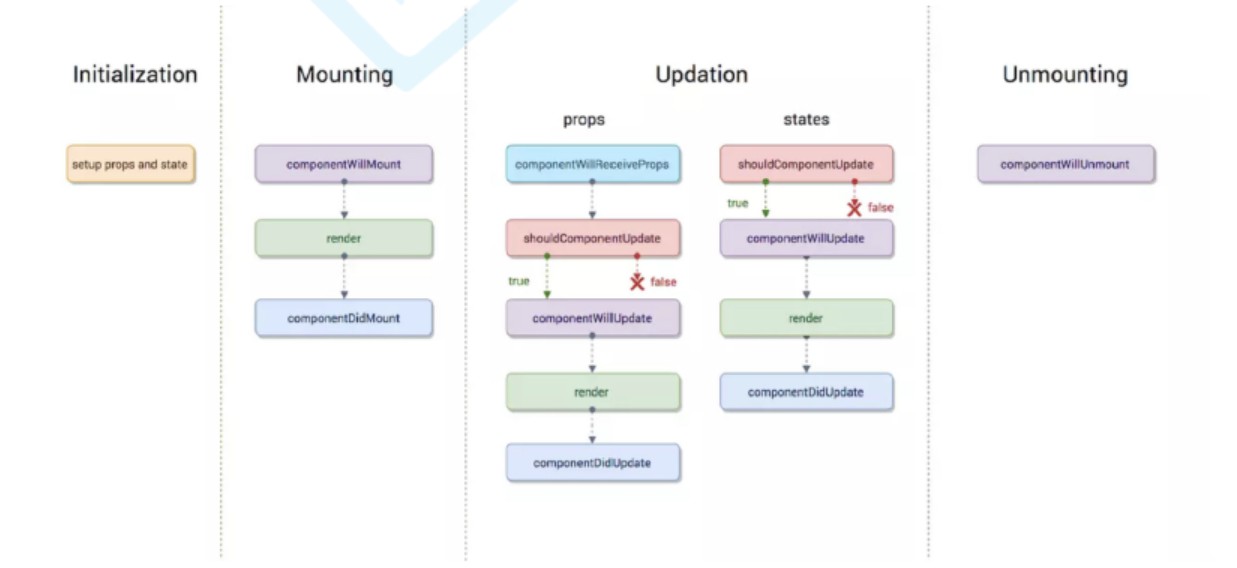
- 解析和生命周期
Suspense
用同步的代码实现异步操作
Hooks
Hooks的目的是让开发者完全抛弃class,完全使用函数式。
react原理总结
- 如何解释JSX? 为什么使用JSX?
JSX是对js语法扩展,使我们可以用类似xml方式描述视图,执行快、类型安全、简单快速。
原理:babel-loader会预编译JSX为React.createElement(type,props,…chilrden)
- react编译过程
-
webpack+babel-loader编译时,替换JSX为React.createElement(…)
-
所有React.createElement(…)执行结束会得到一个JS对象树,他能完整描述dom结构,称之为虚拟DOM
-
React-DOM.render(vdom,container)可以将vdom转换为dom追加至container中。通过遍历vdom树,根据vtype不同,执行不同逻辑:vtype为1生成原生标签,vtype为2实例化class组件并将其render返回的vdom初始化,vtype为3直接执行函数将结果初始化
-
React.createElement、React.Component、ReactDom.render 三大接口解析
- setState
setState是react中内部状态的更新器,setState并没有直接去操作渲染,而是执行了一个异步的updater队列。
- diff策略(为什么使用虚拟DOM, 优点是什么)
- WebUI中DOM节点跨层级移动操作特别少,可以忽略不计,所以diff算法都是同级比较
- 拥有相同类的两个组件会生成相似的树形结构,拥有不同类的两个组件会生成不同的树形结构
- 对于同一层级的一组节点,他们可以通过唯一id进行区分
基于以上三个策略,React分别对tree diff, component diff以及element diff进行算法优化。 当节点处于同一层级时,react diff提供了三个节点操作,分别是:INSERT_MARKUP(插入)、MOVE_EXISTING(移动)、REMOVE_NODE(删除节点)