前言
日常开发中我们可能比较少去对项目进行webpack配置或者去优化webpack配置,所以就谈不上对webpack plugin、loader、整体流程有了解。
为了更高的理解webpack插件原理有了如下文章:
在这篇文章中,我们将探讨如何编写webpack插件。webpack是一个非常流行的JavaScript模块打包工具,使用它可以将多个JavaScript模块打包成一个或多个bundle文件。webpack有很多功能和特点,其中一项非常重要的特点就是其可扩展性,通过编写webpack插件可以实现各种自定义功能。插件就是webpack的基石。所以掌握webpack插件,能过让我们成为一个更熟练的webpack配置工程师,同时也能解决面试中碰到的webpack plugin问题
本文将从以下几个方面介绍webpack插件:
webpack插件是什么?帮助我们了解webpack为什么设计插件机制- 项目内如何使用插件?帮助我们快速搭建项目的
webpack配置 - 常用
webpack插件及原理?帮助我们了解常用的webpack插件内部是怎么写的,哪些值得我们借鉴 - 编写自己的
webpack插件?根据我们的业务场景,编写一些提升开发效率的插件
插件是什么
为什么设计插件机制
webpack的设计理念是万物皆模块,然后将所有模块打包成一个或者多个bundle文件,但是这并不意味着webpack自身就能满足所有功能,比如chunk提取、代码压缩、css文件提取等等,所以为了使webpack更加了灵活与便于拓展,webpack设计了插件机制,通过插件可以实现各种拓展功能,满足业务需求
怎么定义插件
webpack规定插件必须是一个javascript对象,且对象上必须有一个apply方法,这个apply方法会在webpack进行编译的时候进行调用,插件定义如下所示
const pluginName = 'ConsoleLogOnBuildWebpackPlugin';

class ConsoleLogOnBuildWebpackPlugin {
  apply() {}
}

module.exports = ConsoleLogOnBuildWebpackPlugin;
到这里我们已经已经知道怎么定义一个webpack plugin,虽然这个插件能过被执行,但是不会有任何作用,原因是插件内没有做任何处理,那么插件内怎么去介入webpack的构建流程,影响最终的构建结果呢?其实webpack在执行插件apply方法的时候,会传入一个compiler对象,这个compiler对象上会暴露webpack构建阶段不同节点的hook,然后在这个hook上允许注册对应的callback,如下所示
const pluginName = 'ConsoleLogOnBuildWebpackPlugin';

class ConsoleLogOnBuildWebpackPlugin {
  apply(compiler) {
    // compiler.hooks 包含一组节点,这些节点,都允许注册对应的callback,webpack执行过程中,会调用这个callback,然后在这个callback
    // 调用的时候传入一些参数,然后callback内借助传入的参数修改webpack构建过程中的一些内容,最终影响webpack的构建结果
    compiler.hooks.run.tap(pluginName, (compilation) => {
      console.log('The webpack build process is starting!');
    });
  }
}

module.exports = ConsoleLogOnBuildWebpackPlugin;
webpack构建流程可以简单总结如下图所示 
那么webpack只要在处理的过程中,在各个阶段,执行我们注册的callback,那么我们的插件就可以介入webpack构建流程,我们从webpack源码看下,webpack是怎么触发我们注册的hook callback执行的
const {
	SyncHook,
	SyncBailHook,
	AsyncParallelHook,
	AsyncSeriesHook
} = require("tapable");

this.hooks = Object.freeze({
  /** @type {SyncHook<[]>} */
  initialize: new SyncHook([]),
  /** @type {SyncHook<[CompilationParams]>} */
  compile: new SyncHook(["params"]),
  /** @type {AsyncParallelHook<[Compilation]>} */
  make: new AsyncParallelHook(["compilation"]),
  ...
});


compile(callback) {
  const params = this.newCompilationParams();
  // 调用beforeCompile hook,传入参数params, callback
  this.hooks.beforeCompile.callAsync(params, err => {
    if (err) return callback(err);

    // 调用compile hook,传入参数params
    this.hooks.compile.call(params);

    const compilation = this.newCompilation(params);

    // 调用compile hook 传入参数compilation, callback
    this.hooks.make.callAsync(compilation, err => {
      if (err) return callback(err);

      // 调用finishMake hook 传入参数compilation, callback
      this.hooks.finishMake.callAsync(compilation, err => {
        if (err) return callback(err);

        process.nextTick(() => {
          compilation.finish(err => {
            if (err) return callback(err);

            compilation.seal(err => {
              if (err) return callback(err);

              // 调用afterCompile hook 传入参数compilation, callback
              this.hooks.afterCompile.callAsync(compilation, err => {
                if (err) return callback(err);
                return callback(null, compilation);
              });
            });
          });
        });
      });
    });
  });
}
从源码我们可以看到,webpack在编译的过程中,会在各个节点调用对应的hook,从而执行对应的callback,以达到功能拓展的目的
目前webpack暴露的hook有5类
compiler类hookruncompilercompilationshouldEmitemitdone
compilation类hookbuildModulesucceedModulefinishModulesnormalModuleLoader
ContextModuleFactory类hookbeforeResolveafterResolvecreateModulemodule
NormalModuleFactory类hookbeforeResolveafterResolvecreateModulemodule
JavascriptParser类hookimportcall
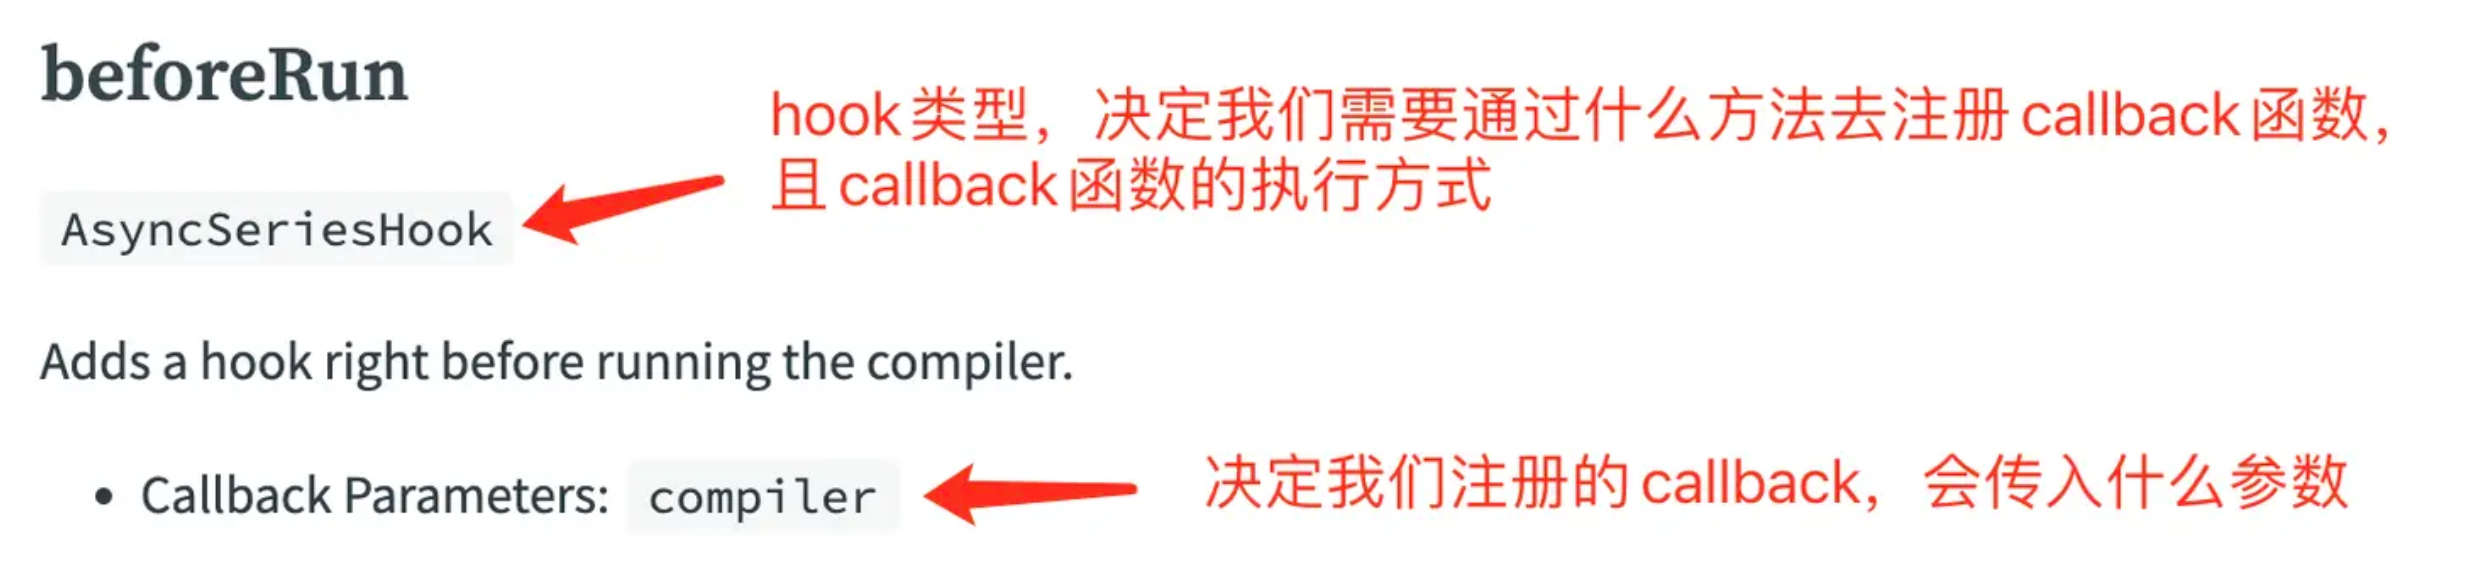
更多hook直接查看文档即可compiler hooks
我们只需要每个hook代表执行的哪个阶段,并且该hook属于哪种类型的hook即可在插件中通过该hook注册callback,完成对应的逻辑。
如所示 我想在编译模块之前做些事情
compiler.hooks.beforeRun.tapAsync('MyPlugin', (compiler, callback) => {
  /* 处理逻辑 */
	callback()
});
比如我想在模块解析之前做些事情 
compiler.hooks.compilation.tap('MyPlugin', (compilation, compilationParams) => {
   compilation.hooks.finishModules.tapAsync(
      'SourceMapDevToolModuleOptionsPlugin',
      (modules, callback) => {
        // modules 就是包含所有module处理完之后的module实例
        callback()
      }
    );
});
比如我想在所有模块处理之后做一些事情 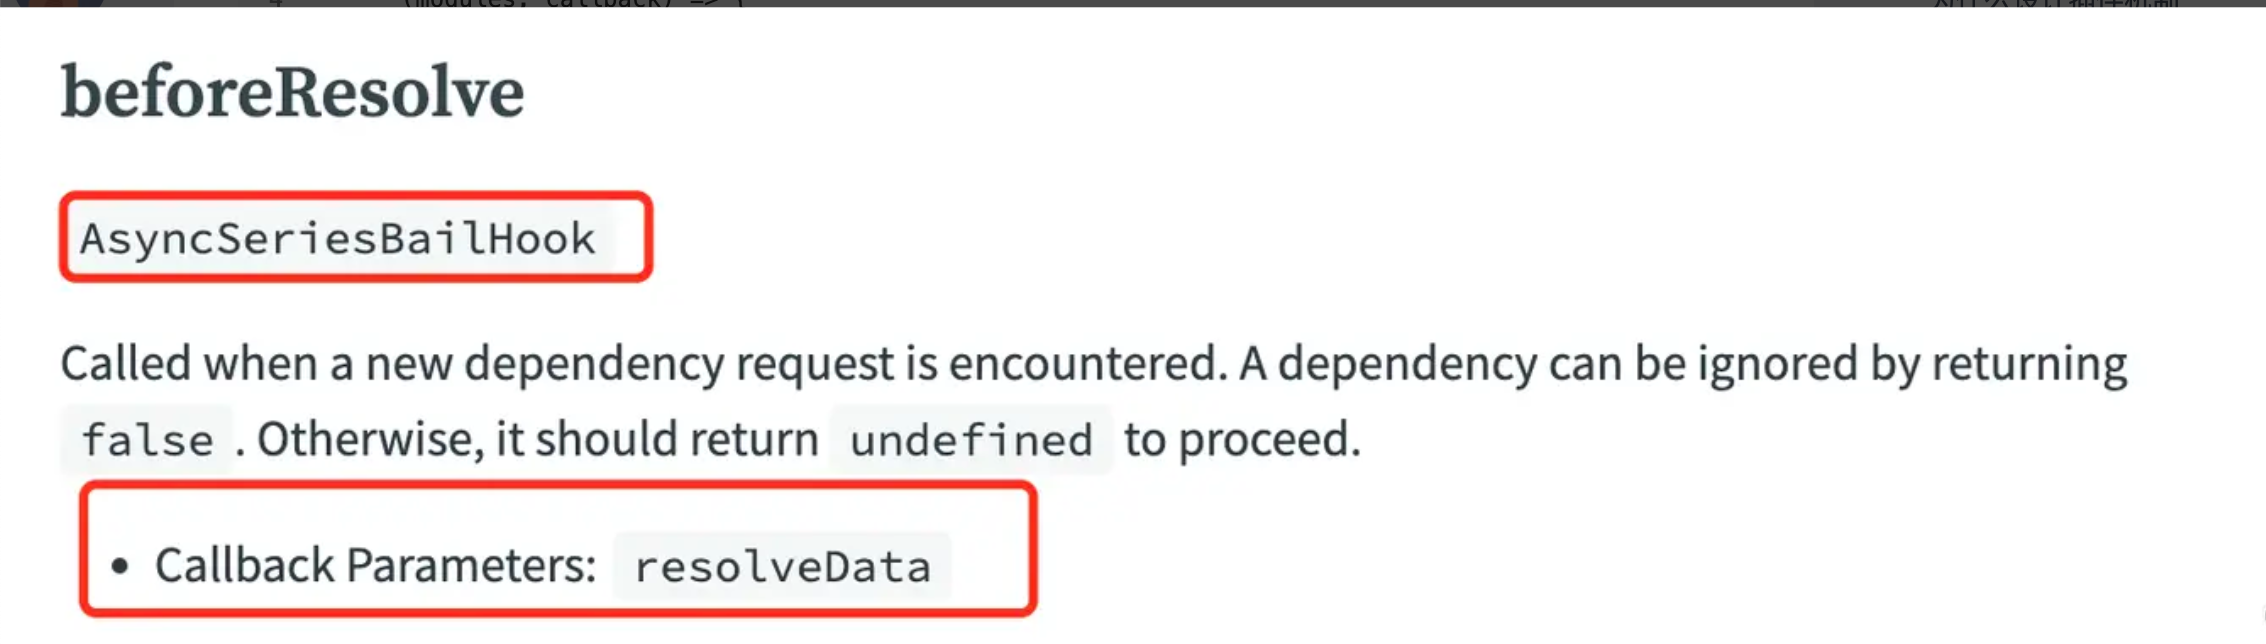
compiler.hooks.compilation.tap('MyPlugin', (compilation, compilationParams) => {
   compilation.hooks.finishModules.tapAsync(
      'SourceMapDevToolModuleOptionsPlugin',
      (modules, callback) => {
        // modules 就是包含所有module处理完之后的module实例
        callback()
      }
    );
});
到这里我们基本上知道,应该怎么去注册callback了,但是我们仔细看的话,hook的类型有很多种,比如
Synchook:同步串行钩子AsyncSerieshook: 异步串行钩子AsyncParallelhook:异步并发钩子SyncBailhook:同步熔断钩子,也就是当有一个返回非undefined的值时,会中断后续callback的执行
那为什么会有这么多种类型,不要这种类型行不行,比如我们注册callback,将这些注册的callback放到一个数组里,然后执行数组内所有的callback不行吗?伪代码如下所示
compiler.hooks.compilation.tap('MyPlugin', callback1)

compiler.hooks.compilation.tap('MyPlugin', callback2)

compiler.hooks.compilation.tap('MyPlugin', callback2)

// 用数组来介绍callback
handles = [callback1, callback2, callback2]

// 然后到执行节点的时候,按照注册顺序执行callback
handles.forEach((handle) => {
  handle(params)
})
这种简单的发布订阅方式实现的插件机制不行吗?不是不行,而是webpack场景更复杂,单纯的通过注册顺序执行无法满足所有需求,所以才设计了更多的插件执行模式
- 比如
callback串行执行 - 比如
callback并行执行 - 比如
callback串行执行,将前一个的结果,传给后一个 - 比如
callback串行执行,只要有一个返回不是undefined的值,就立马返回,中断后面的callback执行等等
webpack把这一套插件机制封装成了一个单独的npm包tapable,tapable提供的hook如下所示
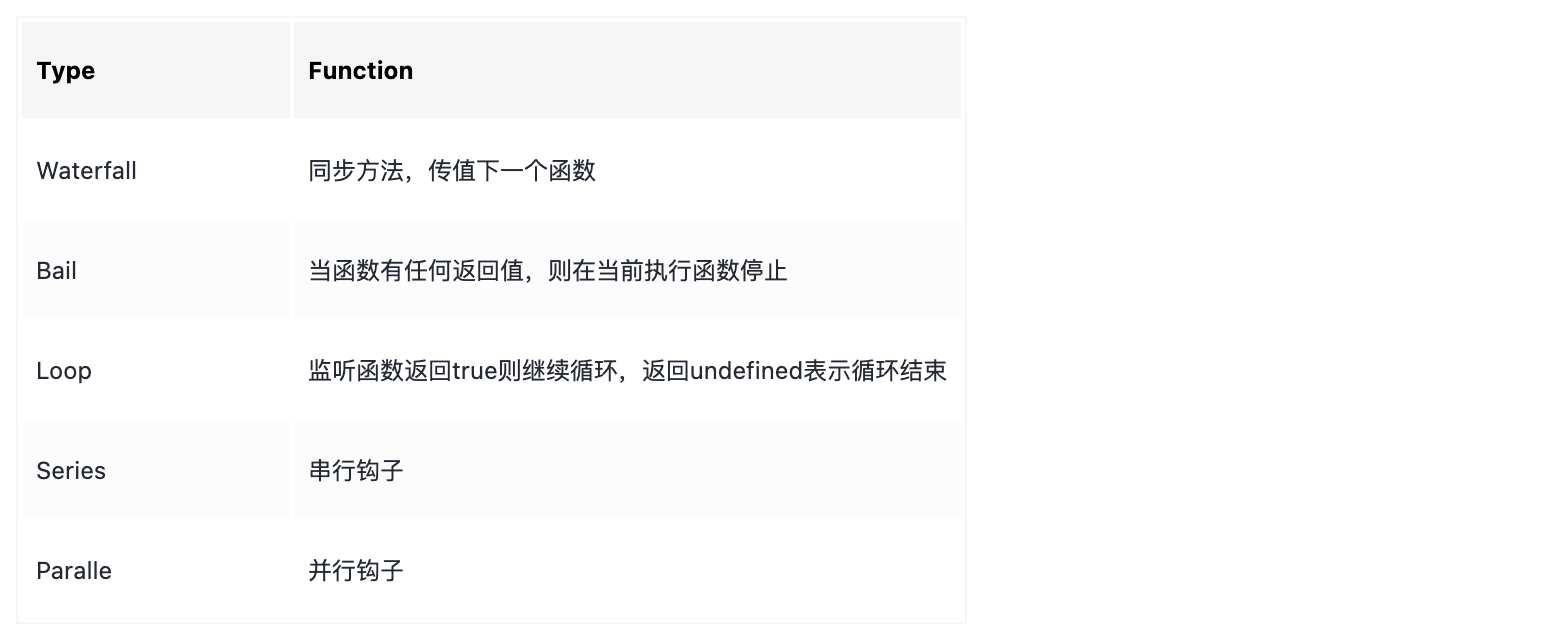
SyncHook同步钩子SyncBailHook同步熔断钩子SyncWaterfallHook同步流水钩子SyncLoopHook同步循环钩子AsyncParalleHook异步并发钩子AsyncParalleBailHook异步并发熔断钩子AsyncSeriesHook异步串行钩子AsyncSeriesBailHook异步串行熔断钩子AysncSeriesWaterfallHook异步串行流水钩子
从功能对Hook分类
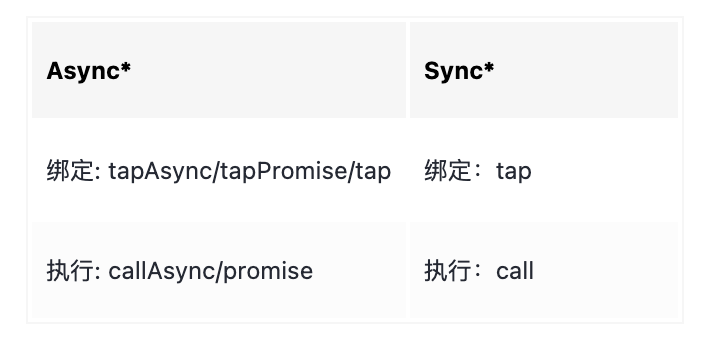
从类型对Hook分类
tapable的实现原理也相当有意思,使用的是字符串拼接 + new Function的方式生成函数体,感兴趣的可以自己通过vscode断点调试的方式去看看源码
所以到这里我们可以知道,写一个webpack插件,需要
- 插件是一个
javascript对象,且该对象必须包含入口apply方法 webpack暴露了5类hook,我们必须要知道我们要介入的节点是哪个hook- 注册
callback的方式,有同步与异步的方式,一定要根据文档的提示hook类型来决定
项目内如何使用插件
上面我们已经知道插件应该怎么定义,那么这一节,我们将会学习怎么在项目内使用插件,本文的案例都是围绕webpack5来讲的
假设我们写的插件如下所示 使用类定义我们的插件
class MyPlugin {
  constructor(opts) {
    this.options = opts
  }
  apply(compiler) {
    compiler.hooks.compilation.tap('MyPlugin', (compilation, compilationParams) => {
       compilation.hooks.finishModules.tapAsync(
          'MyPlugin',
          (modules, callback) => {
          	for (let item of [...modules]) {
              //	 打印每个module的路径
              console.log('item', item.resource);
            }
            callback()
          }
        );
    });
  }
}
使用function定义我们的插件
function MyPlugin2(opts) {
  this.options = opts
}

MyPlugin2.prototype.apply = function(compiler) {
  compiler.hooks.compilation.tap('MyPlugin', (compilation, compilationParams) => {
    compilation.hooks.finishModules.tapAsync(
       'MyPlugin',
       (modules, callback) => {
         for (let item of [...modules]) {
           // 打印每个module的路径
           console.log('item 2', item.resource);
         }
         callback()
       }
     );
 });
}
一份简单的webpack配置
const path = require('path');
const { ProgressPlugin } = require('webpack')
const HtmlWebpackPlugin = require('html-webpack-plugin')
const Myplugin = require('./myPlugin')


const config = {
  mode: 'production',
  output: {
    path: path.join(__dirname, '../dist'),
    filename: 'js/[name].[chunkhash].js',
    chunkFilename: 'chunk/[name].[chunkhash].js',
    publicPath: './'
  },
  plugins: [
    // 使用我们自己的插件
    new Myplugin({
      test: 1
    }),
    // 使用我们自己的插件
    new Myplugin2({
      test: 2
    }),
    // 使用webpack提供的插件
    new ProgressPlugin(
      {
        percentBy: 'entries',
      }
    ),
    // 使用社区提供的插件
    new HtmlWebpackPlugin(
      {
        filename: 'index.html',
        template: path.join(__dirname, '../public/index.html'),
      }
    ),
  ],
  entry: {
    app: path.join(__dirname, '../src/app')
  },
}

module.exports = config
所以其实插件使用只要注意两点
- 插件本身要是
javascript对象,且包含apply方法 - 插件通过
webpack的plugins字段传入
常用插件
以react项目为例,我们一个项目可能会包含哪些插件,这些插件分别是怎么实现功能的,我们通过对这些常用插件的了解,进一步掌握webpack插件原理
基础插件
对插件原理的阅读可能需要一定的webpack基础,可选择跳过原理部分
html-webpack-plugin@5.5.1 html处理插件
使用
const HtmlWebpackPlugin = require('html-webpack-plugin')

module.exports = {
  plugins: [
    new HtmlWebpackPlugin(
      {
        filename: 'index.html',
        template: path.join(__dirname, '../public/index.html'),
        minify: {
          collapseWhitespace: true,
          minifyJS: true,
          html5: true,
          minifyCSS: true,
          removeComments: true,
          removeTagWhitespace: false
        },
      }
    ),
  ]
}
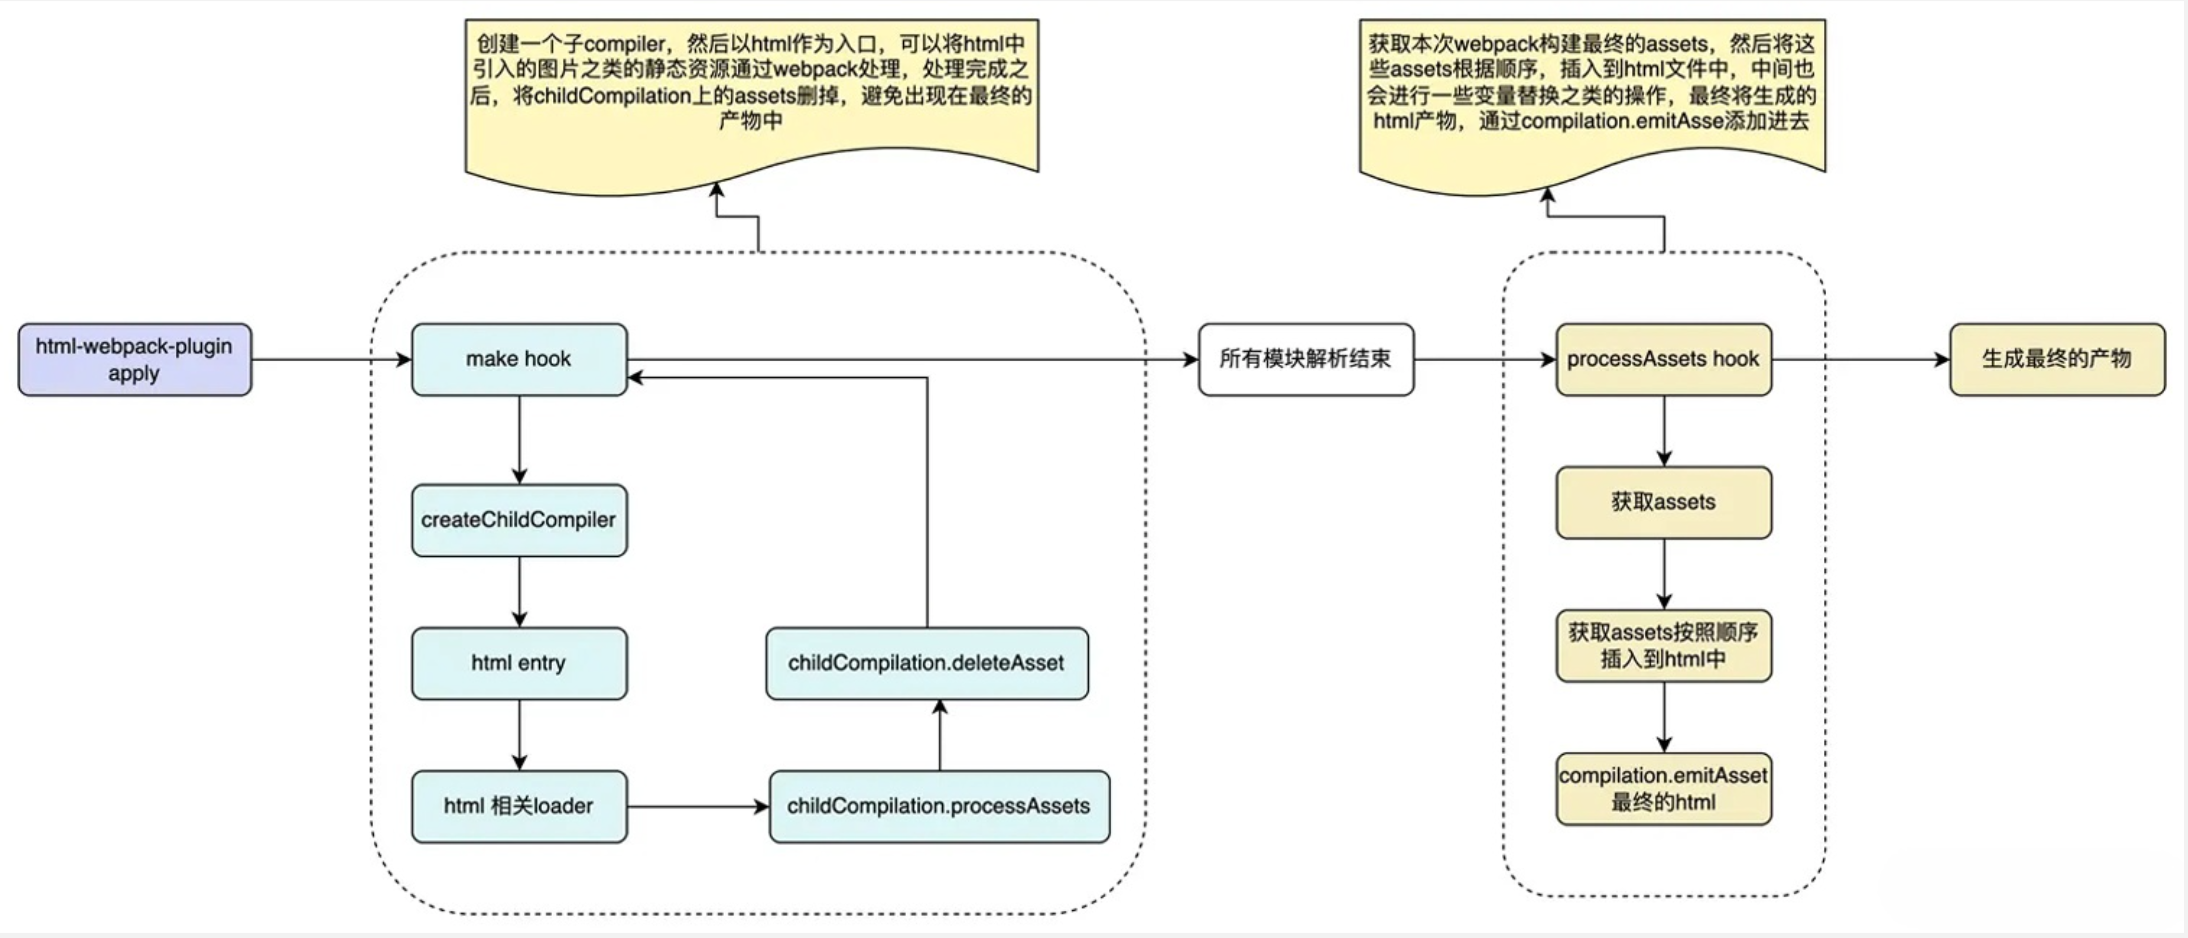
原理 html-webpack-plugin主要做的事情是
- 在
make钩子的callback内创建child compiler,然后通过child compiler去处理传入的filename,最终child compiler处理完之后,会将asset保存到一个对象上,等待最终处理,这里需要注意下child compiler内是删除了asset,这样做的原因是,后续还需要对html进一步处理,比如插入js、css等,避免child compiler处里完之后直接赋值给了父compiler的assets里面 - 在父
compilation的processAssets钩子的callback内,对之前child compiler处理完之后生成的asset,做进一步处理,比如添加js、css、处理publicPath、处理一些变量转化等,然后最终在通过compilation.emitAsset输出最终的html文件
流程图如下图所示
下面是精简过的代码
apply (compiler) {
  // 在compiler实例创建之后,注册第一个hook
  compiler.hooks.initialize.tap('HtmlWebpackPlugin', () => {

    entryOptions.forEach((instanceOptions) => {
      hookIntoCompiler(compiler, instanceOptions, this);
    });
  });
}


function hookIntoCompiler (compiler, options, plugin) {
  compiler.hooks.thisCompilation.tap('HtmlWebpackPlugin',
    (compilation) => {
      // 使用子编译器处理入口html
      compiler.hooks.make.tapAsync(
      'PersistentChildCompilerSingletonPlugin',
      (mainCompilation, callback) => {
        // 创建子compiler,处理html文件,这里使用子编译器的目的是,html内可能还需要处理src等静态资源路径等
        const childCompiler = mainCompilation.createChildCompiler(compilerName, outputOptions, [
          new webpack.library.EnableLibraryPlugin('var')
        ]);

        childCompiler.hooks.thisCompilation.tap('HtmlWebpackPlugin', (compilation) => {
          compilation.hooks.processAssets.tap(
            {
              name: 'HtmlWebpackPlugin',
              stage: Compilation.PROCESS_ASSETS_STAGE_ADDITIONS
            },
            (assets) => {
              temporaryTemplateNames.forEach((temporaryTemplateName) => {
                if (assets[temporaryTemplateName]) {
                  // 用extractedAssets保存html经过webpack处理之后的内容
                  extractedAssets.push(assets[temporaryTemplateName]);
                  // 删除子compiler上的asset,避免赋值到父compiler的asset上
                  compilation.deleteAsset(temporaryTemplateName);
                }
              });
            }
          );
        });
      })

      // webpack处理assets时注册callback
      compilation.hooks.processAssets.tapAsync(
        {
          name: 'HtmlWebpackPlugin',
          stage:
          // 开始优化assets的时候执行
          webpack.Compilation.PROCESS_ASSETS_STAGE_OPTIMIZE_INLINE
        },
        (compilationAssets, callback) => {
          // compilationAssets包含所有最终要生成的文件,html-webpack-plugin在这个callback
          // 内回去拿入口文件,以及处理publicpath等事情,还有html本身提供的一些替换等逻辑,保证最终生成html的时候,html内有准确的js、css地址
          const entryNames = Array.from(compilation.entrypoints.keys());
          const filteredEntryNames = filterChunks(entryNames, options.chunks, options.excludeChunks);
          const sortedEntryNames = sortEntryChunks(filteredEntryNames, options.chunksSortMode, compilation);

          const htmlPublicPath = getPublicPath(compilation, options.filename, options.publicPath);

          const assets = htmlWebpackPluginAssets(compilation, sortedEntryNames, htmlPublicPath);
          const emitHtmlPromise = injectedHtmlPromise
            .then(html => {
              const filename = options.filename.replace(/\[templatehash([^\]]*)\]/g, require('util').deprecate(
                (match, options) => `[contenthash${options}]`,
                '[templatehash] is now [contenthash]')
              );

              // 将最终的html文件输出的assets中去
              compilation.emitAsset(replacedFilename.path, new webpack.sources.RawSource(html, false), replacedFilename.info);
              return replacedFilename.path;
            }).then(() => null));

          emitHtmlPromise.then(() => {
            callback();
          });
        });
    });
}
其实简单总结就是,创建一个child compiler处理html,然后在父compiler处理assets的时候,在将child compiler处理的html内容经过一系列处理之后,通过compilation.emitAsset输出到最终的assets里面
mini-css-extract-plugin@2.7.5 css提取插件
使用
const MiniCssExtractPlugin = require("mini-css-extract-plugin");
module.exports = {
  module: {
    rules: [
      {
        test: /\.(css|less|s[a|c]ss)(\?.*)?$/,
        use: [
          {
            loader: MiniCssExtractPlugin.loader
          }
        ]
      },
    ]
  }
  plugins: [
    new MiniCssExtractPlugin(
      {
        filename: 'css/[name].[contenthash].css',
        chunkFilename: 'css/[name].[contenthash].css'
      }
    )
  ]
}
原理 mini-css-extract-plugin插件主要做的事情是
- 在
loader钩子的callback内向loaderContext添加属性,用来配合MinicssExtractPlugin.loader是否需要使用importModule方法 - 在
thisCompilation钩子注册callback,完成cssModuleFactory、cssDependencyTemplate的注册,便于正确解析css模块与生成最终的css内容 MinicssExtractPlugin.loader内如果支持importModule方法,则会用importModule方法处理css模块,如果不支持importModule则会创建child compiler,然后通过child compiler去处理css文件,child compiler处理完之后,删除child compiler内的asset,然后最终在父compiler统一处理所有的css module- 在
renderManifest钩子注册callback,目的是构造合并chunk内css module的manifest,即将所有的css module合并到对应的css asset里面,创建出css asset
css-minimizer-webpack-plugin@5.0.0 css压缩插件
使用
const CssMinimizerPlugin = require("css-minimizer-webpack-plugin");

module.exports = {
  optimization: {
    minimize: true,
    minimizer: [
      new CssMinimizerPlugin(),
    ]
  },
}
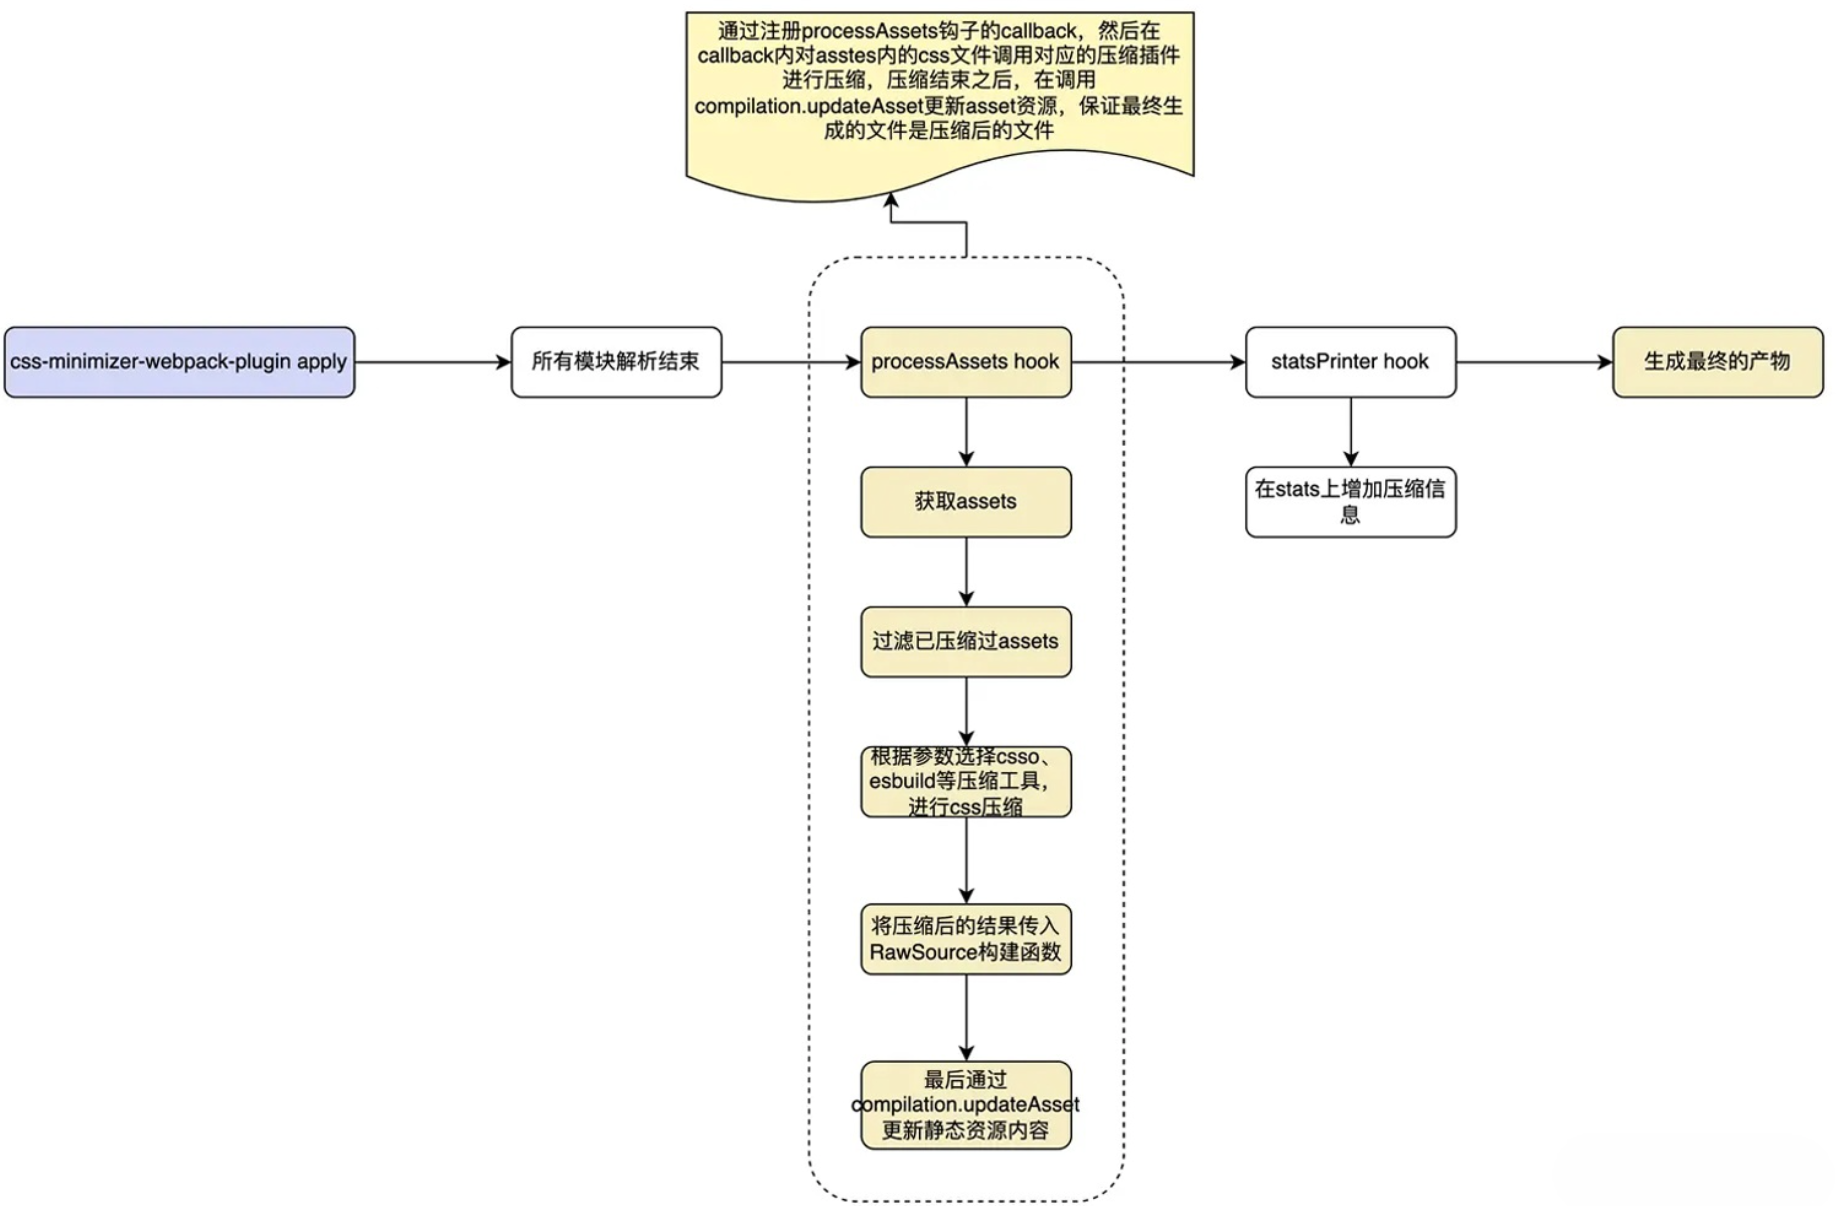
原理 cssMinimizerPlugin插件的核心原理就是通过注册processAssets钩子的callback,然后在callback内对asstes内的css文件调用对应的压缩插件进行压缩,压缩结束之后,在调用compilation.updateAsset更新asset资源,保证最终生成的文件是压缩后的文件
流程图如下图所示
精简后的代码
class CssMinimizerPlugin {

  constructor(options) {
  	// 传入使用的压缩插件,默认使用cssnano插件进行压缩,里面还有csso、esbuild、swc、lightningCss等压缩方式
    const {
      minify = cssnanoMinify,
    } = options || {};

    this.options = {
      minimizer: {
        implementation: /** @type {MinimizerImplementation<T>} */minify,
      }
    };
  }


  async optimize(compiler, compilation, assets, optimizeOptions) {
    const cache = compilation.getCache("CssMinimizerWebpackPlugin");
    let numberOfAssetsForMinify = 0;
    // 遍历assets,过滤已压缩过与不需要压缩的asset
    const assetsForMinify = await Promise.all(Object.keys(typeof assets === "undefined" ? compilation.assets : assets).filter(name => {
			return true;
    }).map(async name => {
      const {
        info,
        source
      } = /** @type {Asset} */
      compilation.getAsset(name);
      return {
        name,
        info,
        inputSource: source,
        output,
        cacheItem
      };
    }));

  	// 借助webpack的RawSource生成最终的source
    const {
      SourceMapSource,
      RawSource
    } = compiler.webpack.sources;
    const scheduledTasks = [];
    for (const asset of assetsForMinify) {
      scheduledTasks.push(async () => {
        const {
          name,
          inputSource,
          cacheItem
        } = asset;
        let {
          output
        } = asset;
        if (!output) {
          let input;
          /** @type {RawSourceMap | undefined} */
          let inputSourceMap;
          const {
            source: sourceFromInputSource,
            map
          } = inputSource.sourceAndMap();
          input = sourceFromInputSource;

          const options = {};
          let result;
          try {
            // 调用压缩方法,比如teser等
            result = await minifyWorker(options);
          } catch (error) {

            compilation.errors.push( /** @type {WebpackError} */

            return;
          }

          for (const item of result.outputs) {
            // 将压缩后的结果,传入RawSource构造函数
            output.source = new RawSource(item.code);
          }
          await cacheItem.storePromise({});
        }

        const newInfo = {
          minimized: true
        };
        const {
          source
        } = output;
        // 最终通过compilation.updateAsset方法更新asset内容
        compilation.updateAsset(name, source, newInfo);
      });
    }
    const limit = getWorker && numberOfAssetsForMinify > 0 ? /** @type {number} */numberOfWorkers : scheduledTasks.length;
    await throttleAll(limit, scheduledTasks);

  }

  apply(compiler) {
    const pluginName = this.constructor.name;
    const availableNumberOfCores = CssMinimizerPlugin.getAvailableNumberOfCores(this.options.parallel);
    compiler.hooks.compilation.tap(pluginName, compilation => {
      // 在processAssets hook注册callback
      compilation.hooks.processAssets.tapPromise({
        name: pluginName,
        stage: compiler.webpack.Compilation.PROCESS_ASSETS_STAGE_OPTIMIZE_SIZE,
        additionalAssets: true
      }, assets => this.optimize(compiler, compilation, assets, {
        availableNumberOfCores
      }));

      compilation.hooks.statsPrinter.tap(pluginName, stats => {
        stats.hooks.print.for("asset.info.minimized").tap("css-minimizer-webpack-plugin", (minimized, {
          green,
          formatFlag
        }) =>
        // eslint-disable-next-line no-undefined
        minimized ? /** @type {Function} */green( /** @type {Function} */formatFlag("minimized")) : "");
      });
    });
  }
}
terser-webpack-plugin@5.3.7 js压缩插件
使用
const TerserPlugin = require('terser-webpack-plugin');

module.exports = {
  optimization: {
    minimize: true,
    minimizer: [
      new TerserPlugin({
        parallel: false,
        terserOptions: {
          // https://github.com/webpack-contrib/terser-webpack-plugin#terseroptions
        },
      }),
    ]
  },
}
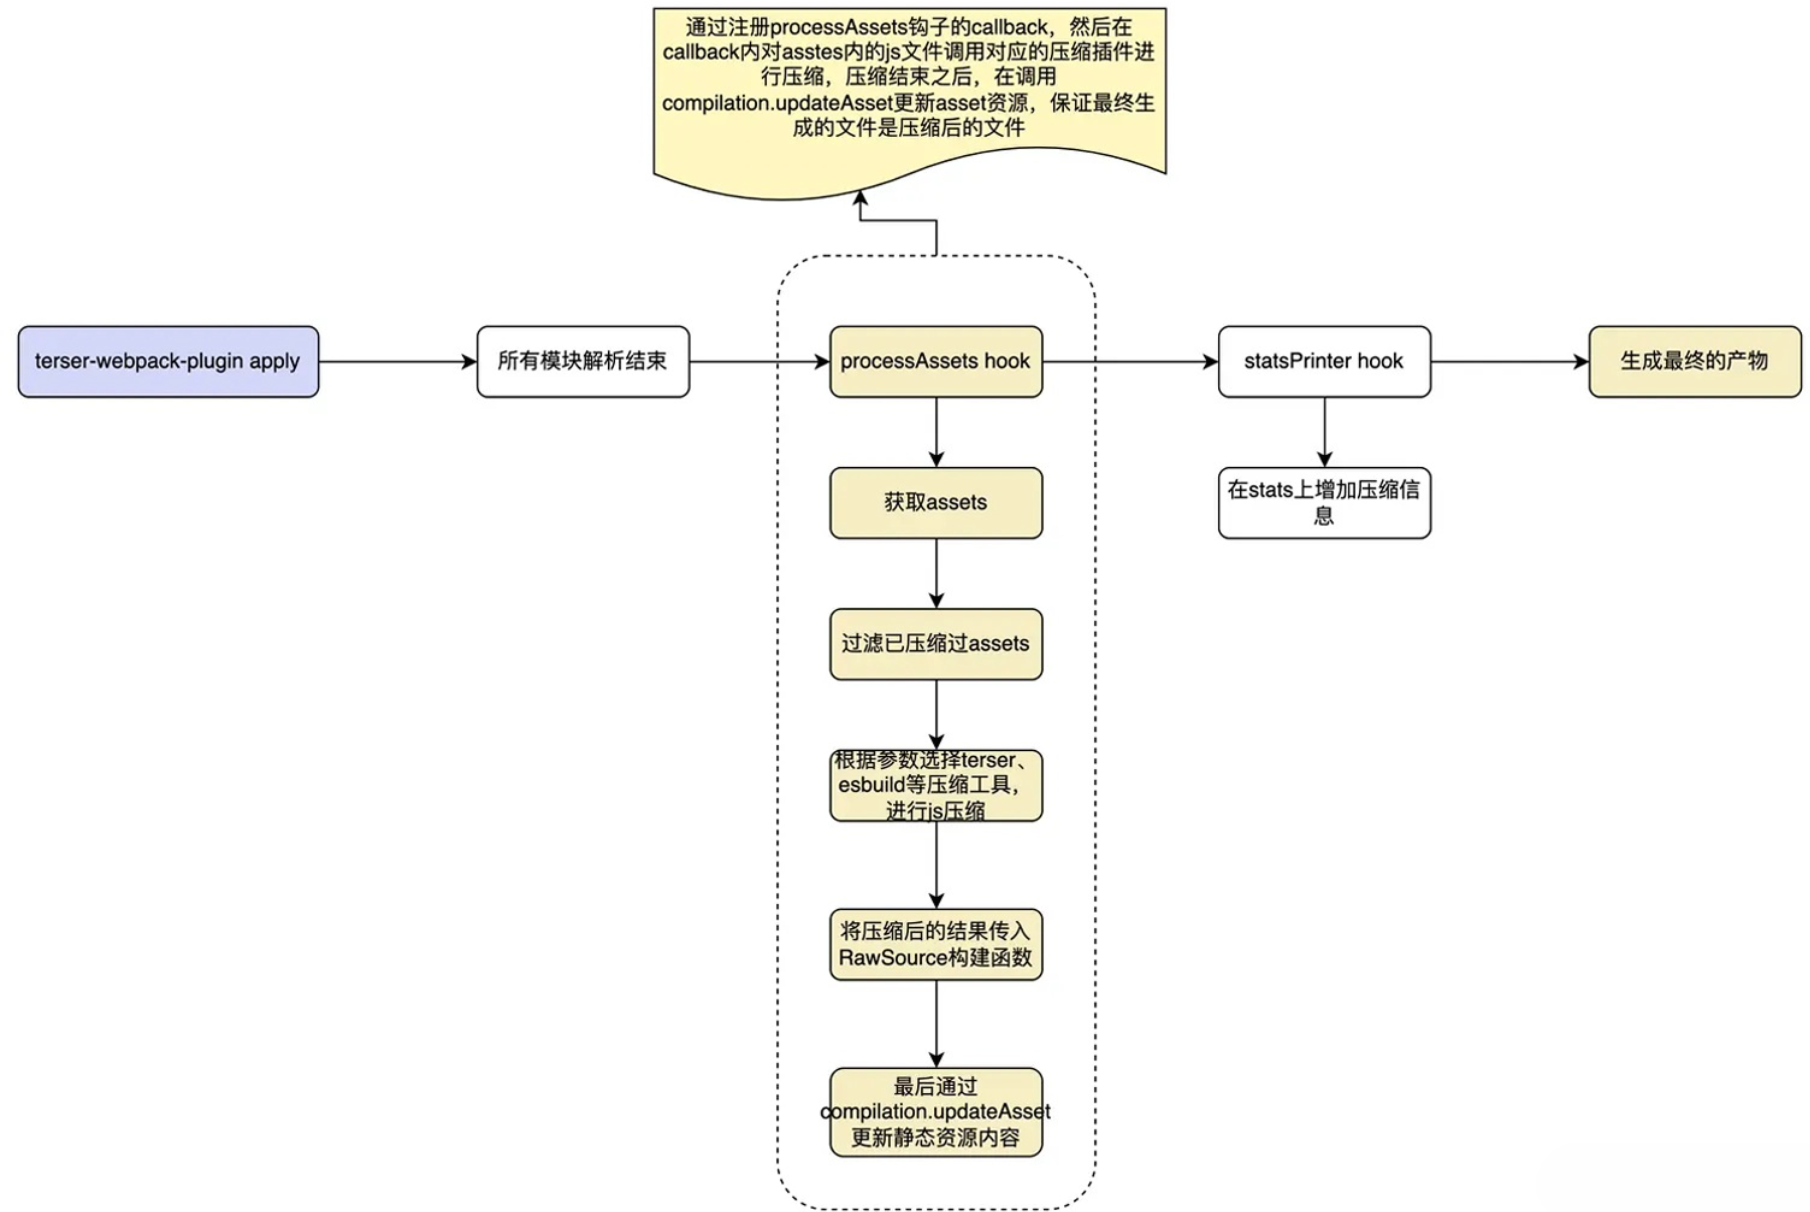
原理 TerserPlugin插件的核心原理就是通过注册processAssets钩子的callback,然后在callback内对asstes内的js文件调用对应的压缩插件进行压缩,压缩结束之后,在调用compilation.updateAsset更新asset资源,保证最终生成的文件是压缩后的文件
流程图如下所示
精简后的代码如下所示
class TerserPlugin {
  constructor(options) {

    // 选择压缩的插件,默认时terser,里面还有uglifyJs、swc、esbuild,可以通过传入的参数控制
    const {
      minify = /** @type {MinimizerImplementation<T>} */terserMinify,
    } = options || {};

    this.options = {
      minimizer: {
        implementation: minify,
        options: terserOptions
      }
    };
  }

  async optimize(compiler, compilation, assets, optimizeOptions) {
    const cache = compilation.getCache("TerserWebpackPlugin");
    let numberOfAssets = 0;
    // 遍历assets,然后返回一个新数组
    const assetsForMinify = await Promise.all(Object.keys(assets).filter(name => {
      return true;
    }).map(async name => {
      const {
        info,
        source
      } = compilation.getAsset(name);
      return {
        name,
        info,
        inputSource: source,
        output,
        cacheItem
      };
    }));

    const {
      SourceMapSource,
      ConcatSource,
      RawSource
    } = compiler.webpack.sources;

    const scheduledTasks = [];
    for (const asset of assetsForMinify) {
      scheduledTasks.push(async () => {
        const {
          name,
          inputSource,
          info,
          cacheItem
        } = asset;
        let {
          output
        } = asset;
        // 表示没有被压缩过
        if (!output) {
          let input;
          let inputSourceMap;
          const {
            source: sourceFromInputSource,
            map
          } = inputSource.sourceAndMap();
          input = sourceFromInputSource;

          const options = {};

          try {
            // 调用压缩插件进行压缩
            output = await minify(options);
          } catch (error) {

            compilation.errors.push( /** @type {WebpackError} */
            return;
          }

          // 使用webpack提供的RawSource构造函数
          output.source = new RawSource(output.code);

          await cacheItem.storePromise({});
        }


        /** @type {Record<string, any>} */
        const newInfo = {
          minimized: true
        };
        const {
          source,
          extractedCommentsSource
        } = output;

        // 更新压缩后的内容
        compilation.updateAsset(name, source, newInfo);
      });
    }
    const limit = getWorker && numberOfAssets > 0 ? /** @type {number} */numberOfWorkers : scheduledTasks.length;
    await throttleAll(limit, scheduledTasks);

  }

  apply(compiler) {
    const pluginName = this.constructor.name;
    const availableNumberOfCores = TerserPlugin.getAvailableNumberOfCores(this.options.parallel);
    compiler.hooks.compilation.tap(pluginName, compilation => {
      const hooks = compiler.webpack.javascript.JavascriptModulesPlugin.getCompilationHooks(compilation);
      const data = serialize({
        minimizer: typeof this.options.minimizer.implementation.getMinimizerVersion !== "undefined" ? this.options.minimizer.implementation.getMinimizerVersion() || "0.0.0" : "0.0.0",
        options: this.options.minimizer.options
      });

      // 注册processAssets钩子的callback,在这里压缩assets
      compilation.hooks.processAssets.tapPromise({
        name: pluginName,
        stage: compiler.webpack.Compilation.PROCESS_ASSETS_STAGE_OPTIMIZE_SIZE,
        additionalAssets: true
      }, assets => this.optimize(compiler, compilation, assets, {
        availableNumberOfCores
      }));

      // 注册statsPrinter钩子的callback,优化控制台输出
      compilation.hooks.statsPrinter.tap(pluginName, stats => {
        stats.hooks.print.for("asset.info.minimized").tap("terser-webpack-plugin", (minimized, {
          green,
          formatFlag
        }) => minimized ? /** @type {Function} */green( /** @type {Function} */formatFlag("minimized")) : "");
      });
    });
  }
}
看完cssMinimizerPlugin与TerserPlugin插件之后,发现两个压缩插件实现基本上是一样的
辅助插件
speed-measure-webpack-plugin@1.5.0 耗时统计插件
使用
const SpeedMeasurePlugin = require('speed-measure-webpack-plugin')

const smp = new SpeedMeasurePlugin();

module.exports = smp.wrap({
  plugins: []
})
原理 speed-measure-webpack-plugin注册compile、done钩子的callback统计webpack本次构建耗时,注册build-module、succeed-module钩子的callback,统计loader链耗时
精简代码如下所示
apply(compiler) {
    tap(compiler, "compile", () => {
      this.addTimeEvent("misc", "compile", "start", { watch: false });
    });
    tap(compiler, "done", () => {
      clear();
      this.addTimeEvent("misc", "compile", "end", { fillLast: true });
    });
}

tap(compilation, "build-module", (module) => {
  // 获取模块的userRequest
  const name = getModuleName(module);
  if (name) {
    this.addTimeEvent("loaders", "build", "start", {
      name,
      fillLast: true,
      loaders: getLoaderNames(module.loaders), //获取处理当前module的loaders数组,用于最终的分组统计与展示
    });
  }
});

tap(compilation, "succeed-module", (module) => {
  const name = getModuleName(module);
  if (name) {
    this.addTimeEvent("loaders", "build", "end", {
      name,
      fillLast: true,
    });
  }
});
webpack-bundle-analyzer@4.8.0 产物大小分析插件
使用
const BundleAnalyzerPlugin = require('webpack-bundle-analyzer').BundleAnalyzerPlugin;

module.exports = {
  plugins: [
    new BundleAnalyzerPlugin()
  ]
}
原理 bundleAnalyzerPlugin注册done钩子的callback,然后在callback内通过stats获取最终的信息,然后起服务,分析stats内的信息,并最终呈现出来
精简后的代码如下所示
class BundleAnalyzerPlugin {
  constructor(opts = {}) {
    this.opts = {};
    this.server = null;
    this.logger = new Logger(this.opts.logLevel);
  }

  apply(compiler) {
    this.compiler = compiler;

    const done = (stats, callback) => {
      callback = callback || (() => {});

      const actions = [];

      if (this.opts.generateStatsFile) {
        // 是否生成stats文件
        actions.push(() => this.generateStatsFile(stats.toJson(this.opts.statsOptions)));
      } // Handling deprecated `startAnalyzer` flag


      if (this.opts.analyzerMode === 'server' && !this.opts.startAnalyzer) {
        this.opts.analyzerMode = 'disabled';
      }

      if (this.opts.analyzerMode === 'server') {
        // 是否起本地服务方式分析
        actions.push(() => this.startAnalyzerServer(stats.toJson()));
      } else if (this.opts.analyzerMode === 'static') {
        // 是否以静态文件的方式分析
        actions.push(() => this.generateStaticReport(stats.toJson()));
      } else if (this.opts.analyzerMode === 'json') {
        // 是否以生成json的方式分析
        actions.push(() => this.generateJSONReport(stats.toJson()));
      }

      if (actions.length) {
        // Making analyzer logs to be after all webpack logs in the console
        setImmediate(async () => {
          try {
            await Promise.all(actions.map(action => action()));
            callback();
          } catch (e) {
            callback(e);
          }
        });
      } else {
        callback();
      }
    };

    if (compiler.hooks) {
      compiler.hooks.done.tapAsync('webpack-bundle-analyzer', done);
    } else {
      compiler.plugin('done', done);
    }
  }
}
@soda/friendly-errors-webpack-plugin@1.8.1 美化错误插件
使用
const FriendlyErrorsWebpackPlugin = require('@soda/friendly-errors-webpack-plugin')

module.exports = {
  plugins: [
    new FriendlyErrorsWebpackPlugin(),
  ]
}
原理 FriendlyErrorswebpackPlugin插件在注册done及invalid钩子上注册callback,然后在done钩子对应的callback内根据stats获取错误及警告,然后在进行对应的美化打印;在invalid钩子注册的callback内处理错误
精简后的代码如下所示
class FriendlyErrorsWebpackPlugin {

  constructor(options) {}

  apply(compiler) {

    const doneFn = stats => {
      this.clearConsole();

      const hasErrors = stats.hasErrors();
      const hasWarnings = stats.hasWarnings();

      if (!hasErrors && !hasWarnings) {
        this.displaySuccess(stats);
        return;
      }

      if (hasErrors) {
        this.displayErrors(extractErrorsFromStats(stats, 'errors'), 'error');
        return;
      }

      if (hasWarnings) {
        this.displayErrors(extractErrorsFromStats(stats, 'warnings'), 'warning');
      }
    };

    const invalidFn = () => {
      this.clearConsole();
      output.title('info', 'WAIT', 'Compiling...');
    };

    if (compiler.hooks) {
      const plugin = { name: 'FriendlyErrorsWebpackPlugin' };

      compiler.hooks.done.tap(plugin, doneFn);
      compiler.hooks.invalid.tap(plugin, invalidFn);
    } else {
      compiler.plugin('done', doneFn);
      compiler.plugin('invalid', invalidFn);
    }
  }
}
编写自己的webpack插件
了解了上面的常用插件原理之后,我们知道,写一个webpack插件,最关键的点就是需要知道webpack大致的构建流程,webpack流程中暴露了哪些hook,而我们的真实场景又是需要在哪个阶段介入,比如上面我们看到的
html-webpack-plugin插件主要目的是,根据传入的模版html文件,生成最终带js、css等静态资源的html文件,那么html-webpack-plugin就在编译开始阶段的make hook上注册callback,然后在callback内创建child compiler完成对html文件的编译,然后又在生成asset阶段的hook processAssets上注册callback,在这个callback内获取已经生成的assets,然后插入到html内terser-webpack-plugin插件的主要目的是压缩js代码,那么要压缩肯定也是编译结束生成assets之后,然后对assets内的js进行压缩,所以是在assets生成阶段的processAssets hook上注册callback,然后在callback内对js文件进行压缩
是以我们要编写自己的webpack插件
- 先确定自己的目的
- 根据目的选择介入的
webpack阶段 - 然后在该阶段内,找
webpack暴露的hook - 然后注册对应
hook的callback,在callback内完成对应的目的 - 有些复杂场景可能会涉及到多个阶段的不同
hook,那就需要自己多翻翻webpack文档
下面用几个具体的例子带领大家一起写webpack插件
约定式路由插件
我们不想要在项目手动进行routes配置,而是通过一些目录约定自动帮助我们生成路由配置文件,我们只需要加载这个路由文件即可
根据我们的目的来确定怎么写这个插件
目的:自动生成routes配置
webpack阶段:肯定要在编译之前,不然webpack会构建二次
webpack编译之前的hook有:environment、initialize等很多hook,我们这里选择initialize
initialize callback内逻辑:处理路由文件生成与文件监听的逻辑
代码如下所示
const pluginName = 'ReactAutoRoutePlugin'
class ReactAutoRoutePlugin extends BaseRoute {

  constructor(options: IGetRoutesOpts) {
    super(options);
    this.options = options;
    this.isWriting = false;
  }

  apply(compiler: Compiler) {
    if (process.env.NODE_ENV === 'production') {
      compiler.hooks.run.tapPromise(pluginName, async () => {
        await this.writeFile();
      })
    } else {
      compiler.hooks.initialize.tap(pluginName, async () => {
        await this.writeFile();
        this.watchAndWriteFile();
      })
    }
  }
}
最终产物如下图所示 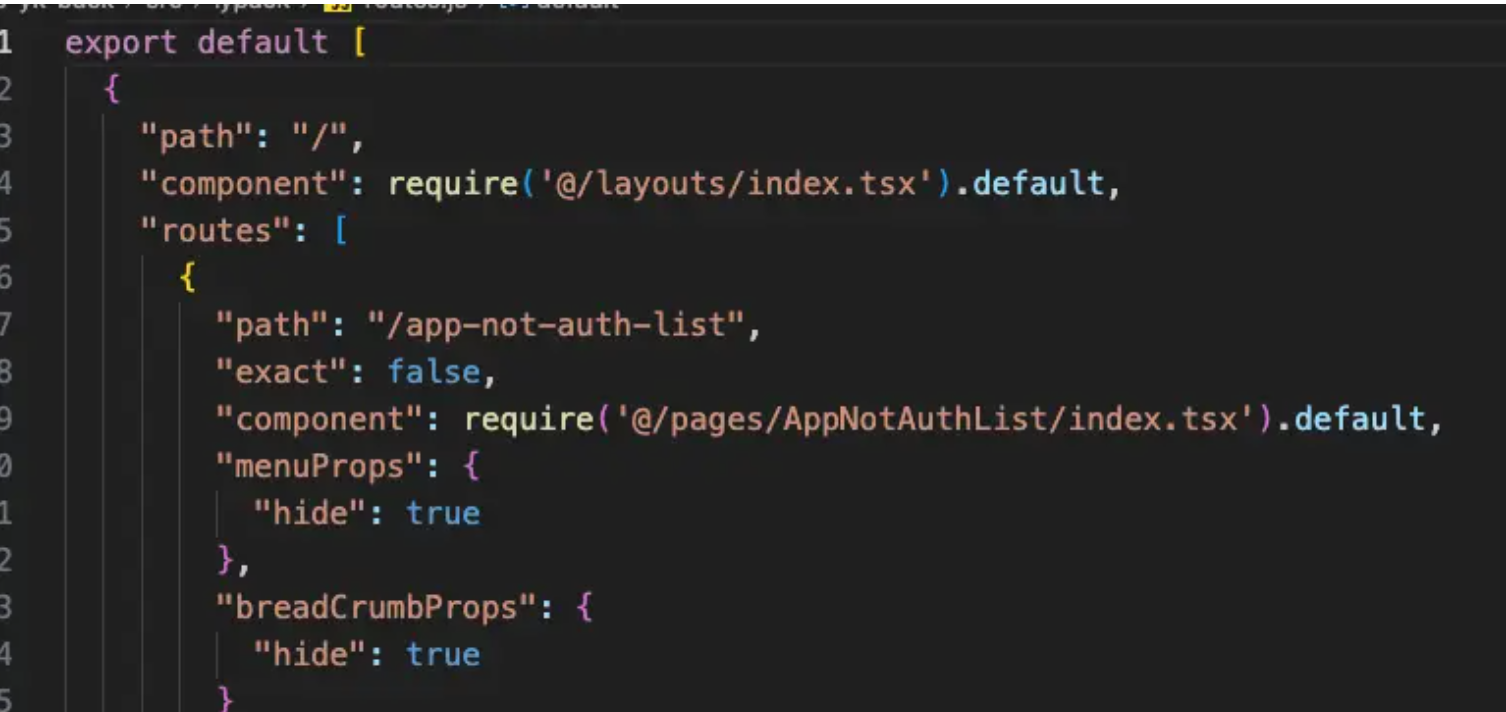
注意点:这里只需要保证callback执行在webpack处理模块之前生成路由文件,避免在webpack处理模块之后生成,导致webpack重新编译或者最终的产物不包含最新的route内容
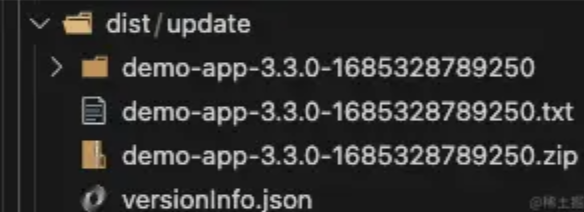
生成zip包插件
比如混合app场景,app想要更新内容,我们使用的方式,就是在构建的时候将静态资源打包成一个zip包,然后远程通过拉取这个zip包达到资源更新的目的
根据我们的目的来确定怎么写这个插件
目的:生成zip包与一些辅助验证文件 webpack阶段:肯定要在编译之后,也就是assets生成阶段
webpack assets生成阶段的hook有:emit、processAssets、afterProcessAssets等很多hook,我们这里选择emit
emit callback内逻辑:处理zip包压缩逻辑与创建新的asset逻辑
代码如下所示
export default class BuildZip {
  private options: Opts;
  constructor(options: Opts) {
    this.options = options;
  }
  async handlerZip(compilation: Compilation, callback: any) {
    if (compilation.compiler.isChild()) {
      return callback();
    }
    const { versionConfig, zipConfig } = this.options;
    const assetsCache = compilation.assets;
    // 将静态资源通过yazl处理成zip包
    const [zip, config] = await Promise.all([
      doZip(compilation, this.options),
      generateConfig(compilation, this.options),
    ]);

    // 兼容webpack5与webpack4,webpack5可以直接在compiler.webpack.sources上直接获取操作source相关的构造函数
    const { RawSource } = compilation.compiler.webpack
      ? compilation.compiler.webpack.sources
      : require('webpack-sources');

    // 将zip合并成一个
    const zipContent = new RawSource(Buffer.concat(zip as any) as any);
    if (zipConfig.removeBundle === true) {
      // 清空assets准备重新赋值
      compilation.assets = {};
    } else if (typeof zipConfig.removeBundle === 'function') {
      const assets = {} as { [key: string]: any };
      for (const name in compilation.assets) {
        if (compilation.assets.hasOwnProperty(name)) {
          if (!zipConfig.removeBundle(name, compilation.assets[name])) {
            assets[name] = compilation.assets[name];
          }
        }
      }

      compilation.assets = assets;
    }

    const zipFileName = zipConfig.filename.replace('.zip', '');
    const fileKeys = Object.keys(assetsCache);
    // 保留原来的js、css等静态资源
    fileKeys.map((key) => {
      compilation.assets[`${zipFileName}/${key}`] = assetsCache[key];
    });

    // 添加一个包含文件目录的txt
    compilation.assets[`${zipFileName}.txt`] = new RawSource(fileKeys.join('\n'));

    // 生成zip包
    compilation.assets[zipConfig.filename] = zipContent;

    const content = JSON.stringify(config, null, '\t');

    // 生成版本信息json文件
    compilation.assets[versionConfig.filename] = new RawSource(content);

    callback();
  }
  apply(compiler: Compiler) {
    const { pass } = this.options;
    if (!pass) {
      // webpack5注册hook
      if (compiler.hooks) {
        compiler.hooks.emit.tapAsync('BuildZipPlugin', this.handlerZip.bind(this));
      } else {
        // webpack4之前注册hook方式
        // @ts-ignore
        compiler.plugin('emit', this.handlerZip.bind(this));
      }
    }
  }
}
最终产物如下图所示
tree-shaking插件
在项目内引入一些npm包,但是一些npm包没有主动声明sideEffects,这时候看了代码之后,确定是没有副作用的,那么可以通过自动插件控制这个包的sideEffects,另外就是有些包设置了sideEffects但是在一些极端场景下会导致tree-shaking不对,项目运行的时候报错
根据我们的目的来确定怎么写这个插件
目的:为一些npm包自动添加sideEffects及去掉一些npm包的sideEffects
webpack阶段:肯定要在编译过中,也就是module实例生成阶段
webpack module生成阶段的hook有:createModule、module等很多hook,我们这里选择module
module callback内逻辑:控制module上的元数据逻辑
代码如下所示
class ControlNpmPackageSideEffectsPlugin {
  noSideEffectsPackages: string[]
  hadSideEffectsPackages: string[]
  constructor({
    noSideEffectsPkgs = [], // 传入需要处理的npm package name
    hadSideEffectsPkgs = [], // 传入需要处理的npm package name
  } = {}) {
    this.noSideEffectsPackages = noSideEffectsPkgs;
    this.hadSideEffectsPackages = hadSideEffectsPkgs;
  }
  apply(compiler: Compiler) {
    if (!this.noSideEffectsPackages.length && !this.hadSideEffectsPackages.length) return;
    const name = this.constructor.name;

    compiler.hooks.normalModuleFactory.tap(name, (normalModuleFactory) => {
      // 在module实例创建之后,通过修改module相关的meta数据信息,改变模块或者包的sideEffects配置
      normalModuleFactory.hooks.module.tap(name, (module, data) => {
        const resolveData = data.resourceResolveData;

        // 如果npm包没有设置sideEffects,且满足includePackages,就设置sideEffectFree: true,表示该模块是纯的
        if (
          this.noSideEffectsPackages.some((item) => data?.resource?.includes(item)) &&
          resolveData &&
          resolveData.descriptionFileData &&
          resolveData.descriptionFileData.sideEffects === void 0
        ) {
          // 处理npm包没有标记了sideEffects的场景
          module.factoryMeta.sideEffects = false;
        }

        if (
          this.hadSideEffectsPackages.some((item) => data?.resource?.includes(item)) &&
          resolveData &&
          resolveData.descriptionFileData &&
          resolveData.descriptionFileData.sideEffects !== void 0
        ) {
          // 处理npm包标记了sideEffects的场景
          resolveData.descriptionFileData.sideEffects = undefined;
        }
      });
    });
  }
}
本地服务插件
有这样的场景,开发环境没有问题,但是上到测试环境之后,运行的时候报错,这时候没有source-map,代码又是压缩过后的,不太方便排查问题,如果这个时候我们可以直接在本地build一份构建后的产物,然后又可以请求测试环境的数据就很方便,我们可以通过一个自定义插件帮助我们达成这个目的
根据我们的目的来确定怎么写这个插件
目的:为本地build之后的产物,可以直接通过服务访问,并且可以请求到测试环境的数据
webpack阶段:肯定要在编译结束之后起服务,与编译过程中替换一些html中的占位符
webpack 结束阶段的hook有:done,我们这里选择done
webpack 编译过程中的hook有:compilation、thisCompilation,我们这里选择compilation done callback内逻辑:起server服务逻辑
compilation callback内逻辑:**注册html-webpack-plugin hook修改html内占位字符
代码如下所示
export default class LocalDebugSettingPlugin {
  local_debug: string | undefined;
  constructor({ userConfig }) {
    this.local_debug = process.env.LOCAL_DEBUG;
    this.userConfig = userConfig;
  }

  apply(compiler: Compiler) {
    if (this.local_debug) {
      if (envs.includes(this.local_debug)) {
        this.registerReplace(compiler);
        !process.env.LOCAL_DEBUG_NO_SERVER && this.addService(compiler);
      } else {
        console.log('当前process.env.LOCAL_DEBUG的值不是支持的类型,目前支持', envs.join(','));
        process.exit(1);
      }
    }
  }

  getHtml(html: string) {
    if (typeof html !== 'string') return html;
    const OSS_HOST = 'https://xxxx.com';
    const ENV = this.local_debug as string;
    const DEPLOY_ENV = this.local_debug as string;
    return html.replace(/__OSS_HOST__/gm, OSS_HOST).replace(/__ENV__/gm, YUNKE_ENV).replace(/__DEPLOY_ENV__/gm, DEPLOY_ENV);
  }

  replaceHtml(htmlPluginData, callback) {
    if (typeof htmlPluginData.html === 'string') {
      htmlPluginData.html = this.getHtml(htmlPluginData.html);
    }
    callback(null, htmlPluginData);
  }

  registerReplace(compiler: Compiler) {
    if (compiler.hooks) {
      compiler.hooks.compilation.tap('LocalDebugSettingPlugin', (compilation) => {
        if (compilation.hooks.htmlWebpackPluginAfterHtmlProcessing) {
          compilation.hooks.htmlWebpackPluginAfterHtmlProcessing.tapAsync(
            'EnvReplaceWebpackPlugin',
            this.replaceHtml.bind(this),
          );
        } else {
          const htmlWebpackPlugin = compiler.options.plugins.filter((plugin) => plugin.constructor.name === 'HtmlWebpackPlugin');
          if (htmlWebpackPlugin.length) {
            htmlWebpackPlugin.forEach((item) => {
              item.constructor.getHooks(compilation).beforeEmit.tapAsync('LocalDebugSettingPlugin', this.replaceHtml.bind(this));
            });
          } else {
            const HtmlWebpackPlugin = require('html-webpack-plugin');
            if (!HtmlWebpackPlugin) {
              throw new Error('Please ensure that `html-webpack-plugin` was placed before `html-replace-webpack-plugin` in your Webpack config if you were working with Webpack 4.x!');
            }
            HtmlWebpackPlugin.getHooks(compilation).beforeEmit.tapAsync(
              'EnvReplaceWebpackPlugin',
              this.replaceHtml.bind(this),
            );
          }
        }
      });
    } else {
      compiler.plugin('compilation', (compilation) => {
        compilation.plugin('html-webpack-plugin-before-html-processing', this.replaceHtml.bind(this));
      });
    }
  }


  addService(compiler) {
    const { outputRoot = '/dist', devServer = {}, publicPath = '/' } = this.userConfig;
    const contentBase = `${path.join(process.cwd(), outputRoot)}`;
    const devServerOptions = Object.assign({}, {
      publicPath,
      contentBase: [contentBase],
      historyApiFallback: true,
    }, devServer, { inline: false, lazy: true, writeToDisk: true, watchContentBase: false, filename: /not-to-match/ });

    if (!compiler.outputPath) {
      compiler.outputPath = path.join(process.cwd(), outputRoot);
    }

    compiler.hooks.done.tap('LocalDebugSettingPlugin', (stats) => {
      server.listen(devServerOptions.port, devServerOptions.host, (err: Error) => {
        if (err) {
          throw err;
        }
        console.log();
        console.log('- 已开启本地生产调试模式,可以直接使用上面的链接地址进行访问');
        console.log();
      });
    });

    const server = new WebpackDevServer(compiler, devServerOptions);
  }
}
总结
webpack插件看似很难掌握,但其实只要掌握关键点,完成大部分业务需求还是问题不大。最后插件架构或者微内核架构目前是前端很常用的一种架构模式,在babel、rollup、esbuild、vite中都能看到这种架构,只不过插件插件定义与运行略有不同,但是这种思想是想通的,所以掌握插件架构能够对我们的日常开发有一定的好处